Thursday 25 December 2014

Christmas Updates in TrakIT !

Merry Christmas and a Happy New Year! This holiday season, we have several new updates in TrakIT.

A major change is the way TrakIT handle Bill of Lading numbers (T/D or S/I). Previously, these numbers were applicable to work orders only and different shipments could have the same shipment number provided they were in different corridors.

Now, the shipment number has become a unique number specific to each shipment. Two different shipments cannot have the same number. If you modify different shipments to have the same shipment number, you are in effect, merging them into a single shipment. Furthermore, all work orders in a shipment must belong in the same corridor.

You will see a few changes relating to this. But for most part, the majority of the changes are internal to TrakIT.


1) Changing the Shipment Number (T/D or S/I)

It is now possible to specify how Shipment numbers (T/D or S/I) can change (either one work order, all work orders or selected work orders).

Now, instead of changing shipment number by modifying work order header, users can perform this task from the work order header menu, as shown below:


Click on 'Change S/I (or T/D)' to change the number of the work order or for the entire shipment. The following dialog box will open up:


Enter the new number and select the scope of this change. It can be one of the following:

  • All work orders in shipment - This option allows users to change the number of all work orders belonging to this shipment.
  • This work order only - This option allows users to change the number of the current work order.
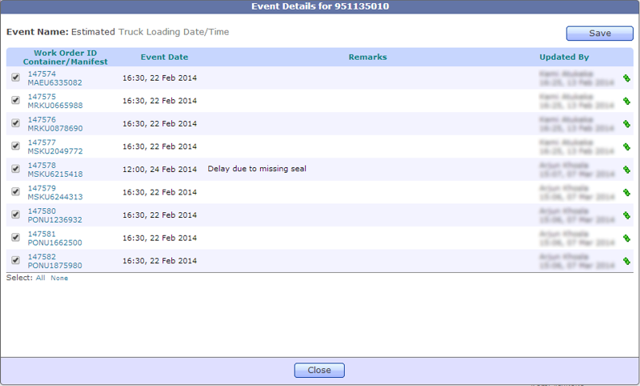
  • Selected work orders in shipment - This option allows users to change the number for partial shipment. When this option is selected, a list of all the work orders belonging to this shipment is displayed and the users can select the work orders for which the number should change.

TrakIT checks if the new number entered by the user is already present or not. In case there is already a shipment with that number, then users can merge more work orders into that shipment by selecting 'Allow Joining with Existing Shipment'.

Please note that 2 shipments can be merged together only if they belong to the same corridor and users can change number only within 2 months of work order creation.


2) Creating New Work Orders

When creating new work orders, users must now specify whether the work orders to be created are a new shipment or to be added to an existing shipment.


When adding to the an existing shipment, TrakIT will check to make sure that the corridor of the existing shipment matches the new corridor specified.


3) View Master Event/Data usage in Corridors

Administrators can select an Event or Data field in the Master tables and all events and data fields from various corridors are displayed right there, where they can be modified as usual.


This allows you to compare and align names and codes for the same master event across different corridors.

The same can be done for Form Definitions, KPI Definitions and Entity Groups.


For any queries, please feel free to contact TrakIT Support.

Merry Christmas and a Happy New Year!

Monday 24 November 2014

Don't Update Events One by One

As per the system log, we're noticing that a lot of users update events or data one by one on shipments with multiple work orders. For most events, 'Apply to T/D' does the trick when the event happens at the same time for all work orders. But where the values are different, users are entering these values one by one.

For example: A shipment has 15 work orders and these have been loaded on trucks. Each work order will obviously have a different truck number. Users open one work order, enter the truck number on the Data section and then switch to another work order to do the same. This is done 15 times to update all truck numbers.

This is absolutely unnecessary! In the above example, all truck numbers can be updated simultaneously. On any one of the work orders, click the event/data name and a popup opens displaying the data for all work orders in the shipment.


Once you have updated the relevant fields, you can click 'Save' to update all work orders in one go!

In case of some events or data fields, you can also copy values from one row to other selected rows by clicking on the green plus icon.

For example, if you wanted to populate "ABC" in all rows except the last two, just de-select the check-boxes on the last two rows and enter the value "ABC" in any of the remaining rows and click the green icon on that row.

For any assistance or clarifications, please contact TrakIT Support.

Saturday 11 October 2014

TrakIT can expand!

With computer monitors getting larger, TrakIT seemed to be getting smaller in width. Until now, TrakIT was fixed in width at about 960 pixels so it would fit comfortably on a screen of 1024 pixels horizontal resolution.

With the latest update, TrakIT has changed it width to be "fluid". This means that if you have a larger screen, TrakIT will expand to try and fill the width of your screen. Smaller monitors will continue in the same way.

For larger monitors, TrakIT will expand all the way to a maximum of 1350 pixels. All appropriate elements on the screen will re-size accordingly to provide more working space.

For any clarifications, please contact TrakIT Support.

Thursday 9 October 2014

TrakIT bids good bye to Internet Explorer 7

It's been coming a while and we've finally disabled IE 7 support for TrakIT. TrakIT will now refuse any user who is using any browser that identifies itself as IE 7 or earlier.

IE 7 and earlier browsers are known for extremely buggy behavior that require countless developer hours to make simple page layout work properly. Even later browsers (IE 8 and 9) can use compatibility mode that makes them behave like IE 7. This mode can be set by default for Intranet sites.

If you are using IE 7 or earlier, or your browser is reporting itself to be IE 7, you will see the below message when you try to open TrakIT:


To resolve this, please upgrade your browser to a later version. If you are already using IE 8 or later and are still seeing the above message, please switch off compatibility mode. Go to Tools > Compatibility View Settings and un-check "Display Intranet Sites in Compatibility Mode". See image below:


If you are still having any issues with your browsers, please contact TrakIT Support and we will assist you immediately.


Monday 1 September 2014

Work Order Creation Notification

Up till now, users could receive email notifications when Events/Data fields or KPIs were updated or documents were uploaded in TrakIT. With the latest update, you can now receive email notifications when new work orders are created in selected corridors.

Go to System > Email Notifications and select the appropriate corridor. Click on the 'WO Creation' tab. The following will be displayed:


Select from the 3 available options: No Email Notification, Immediate Notification and Daily Notification. Immediate Notification will enable users to receive an email notification within half an hour after the work orders are created. Daily Notification will enable users to receive a single email notification at about 5am UTC. This email will include notification for all work orders created for the selected corridor(s) since the last notification.

Administrators can also select users to receive WO Creation notification emails for their corridor. Go to Admin > Corridor Definitions and select the appropriate corridor. Select the 'Work Order Creation Notification' option as shown below:

Now click on Add User. A new dialog box will open up as follows:


Type in a few characters of the user's name whom you wish to notify, select the user from the list of users, select the type of notification and click on Add.

For further queries, contact TrakIT Support.

Friday 15 August 2014

Advanced Reports get more advanced

Advanced Reports have been greatly improved with the latest version of TrakIT. A number of options offering finer control over report generation have been introducded.

Alignment, Separators & Sorting
Users can now add various formatting features at field level. When creating or modifying a field, 3 new options have been added, as shown below:


Here is an explanation of the fields:

Alignment: Users can now choose or force the alignment for every field in the report for greater legibility. Fields can be left-justified, right-justified or centre-aligned. If no alignment option is chosen for a field, the formatting may be differ based on the type of data. For example, Excel will align numbers to the right and text to the left by default.

Separator: Data displayed in the reports can be grouped or separated in two ways:
  • Select 'Group' option if you want the data grouped by a specific field. The field appears as a full row and is removed as a column. Sorting on this column takes precedence over other fields.
  • Select 'Sheet' option if you want to completely separate the tables based on a specific field. In HTML, the table is split into several tables. In Excel, several sheets can be created based on the field value with each sheet representing one value of that column. The maximum limit of sheets in 100.

Sort Priority: Users can select up to 3 levels of sorting for their reports. For any field, they must select the sort order as appropriate: 1st, 2nd or 3rd. Report fields will be displayed as per the sort order.

These formatting options used on report fields will reflect across all subscriptions. Please note that these formatting options have no effect whatsoever on subscriptions where the Report Type is CSV. CSV, by definition, cannot contain formatting information.

Highlighting updated Events/Data
Another feature added is the ability to highlight events or data fields in the report that have changed recently. This can be controlled for each subscription. When creating or modifying a subscription, you can choose one of the options shown below:


If selected, the relevant fields are highlighted in a light red color. If the first option "Since last Report emai" is chosen and the last report email was sent more than 7 days ago, no fields will be highlighted. This feature is only valid for Event and Data fields and not applicable to Header and KPI fields. Again, this highlighting will not work for CSV reports.


For further assistance or queries, contact TrakIT Support.

Thursday 7 August 2014

Kewill Import for Damco

Note: This article is valid only for Damco TrakIT users

TrakIT can now import shipments from Damco's Kewill Freight Forwarding system (KFF) using a specially designed Excel template. This enables users to create and update shipments in one go.

Shown below is what the Kewill TrakIT Template looks like:


Users simply need to fill up the excel file with their shipments. TrakIT will automatically create new shipments (work orders) or update existing shipments. Each line in the excel sheet refers to a shipment and not a work order. Thus, each line in the excel sheet can create or update one or more work orders with the relevant data.

The Excel template has the following fields. An explanation of the fields is also provided on the second sheet, titled "Guidance", in the work book.

Corridor Code: Specify the Corridor Code here as it exists in TrakIT. New work orders that are created, will belong to this corridor.

Customer Code: The code specified here must match the customer code as defined in TrakIT. The Shipper/Receiver field of new work orders will be assigned to this customer.

Kewill Booking Number: The booking number specified here will be assigned to the new work orders.

Container Count: Specify the number of containers/work orders to be created (or updated) here.

Transport Document: It must be provided if present in KFF. If left blank, an auto generated number prefixed with 'TBA' will be assigned.

Carrier Code: Provide a code that exists in TrakIT.

Container Numbers: Enter comma separated container numbers here, otherwise auto-generated numbers prefixed with 'TBAU' will be assigned to the work orders. The number of containers here must match the Container Count column.

Container Types: Provide comma separated values for container type codes here. The number of codes here must match the Container Count column.

Shipment Type: The specified shipment type will apply to all new work orders being created.

Commodity: Specify the commodity that will be assigned to all work orders.

Shipper Code: This field (if available in the Work Order Data) will be filled with the value provided here.

Consignee Code: This field (if available in the Work Order Data) will be filled with the value provided here.

Kewill Export Job Number: This field (if available in the Work Order Data) will be filled with the value provided here.

Kewill Import Job Number: This field (if available in the Work Order Data) will be filled with the value provided here.

All the fields are not mandatory. Specifying only mandatory fields will also suffice.

Once the Excel template has been completed, just email it as an attachment to trakit@damco.com with subject as TrakIT Kewill Import. After a few minutes, you will receive a response email from TrakIT with the result of the import for each line in the Excel sheet.

For further queries or assistance, please contact TrakIT Support.


Monday 21 July 2014

Workflow Instructions for Event and Data fields

Among a number of minor changes and fixes, a new feature has been added in the latest update that was released yesterday. Workflow Instructions enables users to receive instructions for events/data by email shortly after they have been populated or updated.

Administrators can set up these instructions for each event or data item in their corridors and also select the recipients for the instructions.

In Admin > Corridor Definitions and select the corridor for which you wish to set up event workflow instructions. Under the Work Order Events/Data tab, click on the menu icon for the desired event/data and select "Workflow" option, as shown below:


The following popup appears once you select the "Workflow" option:


In the 'Select Users to Notify' box, enter the names of the users whom you wish to notify about the workflow instructions and under the 'Specify Workflow Instructions' box, write the workflow instructions for the users (which can be up to 500 characters). The selected users will be informed about the workflow instructions and the work orders in which this event has been updated/modified.

For further queries please contact TrakIT Support.

Tuesday 24 June 2014

Major Change for Container Types

With the upcoming update of TrakIT (build 100), to be released on the 29th of June (Sunday), a major change will be implemented with respect to the way TrakIT handles container sizes and container types. It is important that you go through this article thoroughly and understand the implications and impact of this change.

These changes affect two fields in the work order header - Container Size and Container Type. The Container Size field can currently have value of 20' or 40', or it can be blank. The Container Type can currently have one of the following values:
  • General
  • Insulated
  • High Cube
  • Flat Rack
  • Tank (Gas)
  • Tank (Liquid)
  • Open Top
  • Reefer (Live)
  • Reefer (Dry)
  • Half-Height
  • Platform
The default Container Type was 'General' and you can set the Container Type to any one of the above choices.

In order to align TrakIT with industry ISO standards, the Container Type field will be changed to store the standard ISO Code of the Container Type.

ISO 6346 is an international standard covering the coding, identification and marking of inter-modal (shipping) containers used within containerized inter-modal freight transport. The Size and Type Codes section in the document will now be used by TrakIT to identify the container type and size.

As the Type Code includes the size of the container, the Container Size field in TrakIT will become a read-only field that will be populated automatically when the Container Type is set. Furthermore, the Container Type field in TrakIT will be non-mandatory.

The complete list of the Container Type Codes can be seen in Master Tables > Container Types. Some of these codes are set as "common" and appear in bold. These codes appear first in the list of codes.

The existing Container Types selected in Work Orders will be mapped to the new container codes as per the following table. It is possible the below mapping is not 100% correct for all work orders as there isn't a one-to-one correspondence with the new codes.

Old Container TypeNew Code for 20'New Code for 40'
General22G142G1
Insulated22HR42HR
High Cube25G1L5G1
Flat Rack22P142P1
Tank (Gas)22TN42TN
Tank (Liquid)22TN42TN
Open Top22U142U1
Reefer (Live)22R142R1
Reefer (Dry)22R142R1
Half-Height28G148G1
Platform22P342P3

Selecting a Container Type Code for a Work Order is straight forward. When editing the Work Order Header or creating new work orders, click on the Find link next to the Container Type text box as shown below:


A popup (shown below) opens up with the common container types listed. Click on a code to select it and insert the code into the text box. If the container code required is not a commonly used code, click the Show All link to see the full list of container codes.

As before, you can choose to apply the code to the specific work order or to all work orders in the shipment.

Once the container type code has been entered, the length of the container is automatically set as per the code.


Impact of Changes
  1. Custom & Advanced Reports - All Custom reports and Advanced reports that have the Container Type field present will now export the new code instead of the old one. The Container Size field will remain unchanged and will accordingly export the correct length of the container as per the code.
  2. Corridor Demurrage Defintions - The existing demurrage rate settings will apply to the 20' and 40' containers as applicable. If non-standard container sizes are used (i.e. other than 20' or 40'), demurrage rates will not apply if the particular size has not been defined in the Demurrage definitions for the corridor. Additionally, the Container Type field will be removed from all Demurrage definitions and rates will only apply on the size of the container.
  3. Container Size field has been removed from New Work Order creation page - both for Form Input and CSV input.
  4. Container Size field has been removed from the Edit Work Order page.
  5. All export of work orders will now include the new code for the Container Type field.
  6. A new field called 'Container Type Detail' has been made available to Custom & Advanced reports. This field will provide the description for the container type for the relevant code.

Other Changes in TrakIT

Other notable changes in the new update:


  • The Carrier is now an optional field for Work Order creation.
  • Default date filter for Advanced reports has been increased to 6 months (from 3 months). The default date filter is only applied when the WO Status filter is not being used.
  • A Booking Number field has been added to the WO Header - This field is populated only when work orders are created by an external system.
  • The Global Search feature has been modified to exclude closed work orders. It will now return only active work orders.
  • Several other minors fixes and improvements...


For any questions or concerns, please contact TrakIT Support.


Wednesday 28 May 2014

Work Order Comments

With the last release of TrakIT, you can now add any number of comments on a work order or shipment. A new tab called 'Comments' has been added to the Work Order page.


Click 'Create' to add a new comment for the shipment. Please note that comments apply to the whole shipment and not just one work order. Comments appear in "Newest First" order by default.

Additionally, these comments will be visible to the customer when the TrakIT Customer Access Module will be implemented (This is currently under development). Customers will also be able to make comments here. Therefore, please take care not to post internal or sensitive information here.

Comments once posted cannot be modified. You can, however, delete a comment you have posted within one hour of the posting it, provided no one has posted another comment after yours.

For any questions or concerns, please contact TrakIT Support.

Friday 7 March 2014

New TrakIT Enhancements

In the latest release (build 96), some cool new features have been implemented to give users improved functionality and increased transparency.

Updating Event & Data for the Shipment

Users can now view or update a particular event or data field for multiple work orders belonging to the same shipment with same or different values in one go. This cuts down update time drastically when the same event or data field has different values for each work order. Users don't need to go into each work order to update the field.

When you open any work order that is a part of a shipment with multiple work orders, the event and data fields of the work order appears as a hyper link. Clicking on the event/data field name opens up the following popup:


Here, you can see the selected event for all work orders in the shipment. You can update the event corresponding to any container as required, just like a regular event update in TrakIT and click on the 'Save' button.

To copy the event date/remarks to other rows, select only those containers that you wish to copy to (by selecting/deselecting the check-boxes) and click on the icon (Copy to Selected) on the row from which you wish to copy. For example, if there are 30 work orders in the shipment and you wish to update the event for only 15 of them, just select those 15 rows, enter the event in any one row and click the icon for that row to copy the data to the other 14 rows.

Event fields cannot be updated out of sequence (unless allowed in the corridor), and this may differ for different containers belonging to the same shipment. The same validation process applies as when updating events normally.


Demurrage Fields from Container Tracking in Custom & Advanced Reports

You can now add Free Days, Actual Days and Demurrage fields to your custom or advanced reports that are created by work order, to predict and monitor detention. In the Export Fields tab select the 'Source' as Header and select the  fields as shown below:


The data is, of course, obtained from the Container Tracking module. The work order in question must be active in the Container Tracking list, otherwise no figures will be populated.


Event Completed Count option for Custom & Advanced Reports

You can now add the count of work orders for which a particular event has been completed to Custom and Advanced reports created by B/L, as shown below:


While creating/modifying an event field, the 'Select Option' menu gives you the option to choose 'Event Completed Count', which when selected will display the count of work orders for which this event has been completed. Using this in conjunction with the 'Total WO' field, you can check whether a particular event has been completed for all work orders in the shipment.


For further queries on the above features, please contact TrakIT Support.


Friday 28 February 2014

Broadcasting Messages

Do you wish to inform all users / customers / transporters / agents about some general information or something urgent? TrakIT allows you to do just that...

The Broadcast Messages feature allows Administrators to broadcast a message (along with an optional attachment) to a group of people. This group can be all TrakIT users, customers, transporters and agents of specific countries. 


Go to System > Broadcast Messages to see the list of all the messages that have already been sent out along with the date and time of their broadcast. Click on the message to view the details and the recipients it was broadcast to.


Here is a sample message:


Broadcasting a Message
Click on the 'Create New' button to create a new message for broadcast. The following window appears: 


Under the Recipients section, select one or more Entity Types, User Roles and From Countries. Enter a subject in the Subject section and information that you need to broadcast in the Content section. If you need to attach any document with this message, you can do so by selecting a file to include with the message (max 1 MB). Once the message is ready, click on the Send button and the message will be emailed to all the selected recipients.

Note: If you have selected any of the Entity Types as recipients, then you are allowed to select a maximum of four countries.


For further queries and questions about this feature, please contact TrakIT Support.

Monday 3 February 2014

Slow loading Advanced Reports?

Over the past few weeks, we've discovered that some Advanced Reports were "hogging" the system and slowing performance. Additionally, these reports were being sent out twice or thrice daily...

As an example, a report was generating about 19,000 rows with 24 columns of data - that is about 456,000 data items in one single report! The resulting Excel file was a few megabytes in size and was being sent out daily.

Upon investigation, we found that the filters for the subscription were set incorrectly, thereby causing large amounts of data to be included in the report.

With the latest update of TrakIT (released last Saturday), we've included a way to measure how long a report takes to generate. Under the Advanced Reports subscriptions, you will see a column "Last Gen" that indicates the number of seconds that the report took to generate the last time it was sent or manually generated.

We've also added a filter for system admins to identify long running reports. Take a look at this screenshot:


The "Generation Time" filter is currently visibly only to System Administrator - but it will be made available to all admins shortly.

We recommend you go through your subscriptions to see how long the last report took to generate. If you find the figure missing, it will be updated the next time your report is sent out.

For any questions or clarifications, please contact TrakIT Support.


Saturday 18 January 2014

Two New Reports...

It has been a little longer than usual since the last TrakIT update. Here is the summary of the major changes incorporated in TrakIT's first update of 2014:

Operations Page Filters

The Operations page is the "control center" of TrakIT. It's filters are of paramount importance in finding your shipments quickly. We have tweaked the filters to improve the way TrakIT searches shipments.

Corridor Filter - The "Single/Multiple" selection of corridors has been removed. TrakIT will now detect if a single corridor is selected in the multi-select list and act accordingly.

Other Filters - All other filters are now dependent on the main corridor filter and can change their available options based on the corridors selected. Users will now see only those options that are actually used in their corridor and not the multitude of items in the list. For example: if a user has the Carrier filter enabled, the list of carriers will only include those carriers that have been used in the selected corridors.

When changing corridor selections, it is important to click the icon below the corridor list to refresh all other filters based on the corridor selection.

The filters will, as usual, retain their selections as well as get refreshed as per selected corridors when the page is loaded again.


Demurrage Statistics Report

A new interactive drill-down report has been added. Users can choose specific corridors and see a summary of containers that are presently being tracked in the Container Tracking module as well as the total demurrage figures. Below is a screenshot of Demurrage Statistics Report:


 The following columns are available in the report:

Corridor - Name of the corridor.
Containers - Number of containers currently being tracked.
Average Days - Average number of days for which containers have been tracked.
Maximum Days - Highest number of days of any container that is being tracked.
Average Demurrage - Average rate for each container that is being tracked.
Total Demurrage - Total demurrage for all containers being tracked.


Shipment Status Report

The Shipment Status report provides the number of work orders at each stage of the shipment, i.e. the number of work orders with particular events. Users can select corridors and the complete count of all work orders for each event of those corridors is displayed. Events that have no work orders are excluded from the report. Clicking on the WO Count number drills down to those work orders. Below is a screenshot of Shipment Status Report:


The Oldest and Latest events indicate the number of days since the first and last occurence of a particular event.

For further queries or concerns, please contact TrakIT Support.