Saturday 2 December 2023

Photos for Work Orders

From time to time, our customers need to store images of containers, goods, damages, equipment, etc., on TrakIT. Although it was previously feasible to upload photos under the Documents tab, accessing these images required downloading them again.

In our most recent update, we've introduced a dedicated "Photos" tab within the Work Order. Users can now conveniently upload photos here, and they will be showcased in a gallery format, displaying all images as thumbnails. By clicking on a photo, users can easily view them in a slide-show format.

Visual documentation through photos adds an extra layer of clarity and precision to the communication and record-keeping associated with each shipment. They can capture the condition of the container or truck at various stages, providing a visual history that can be crucial for dispute resolution, quality control, and accountability.

Below is a preview of the newly added Photos tab:


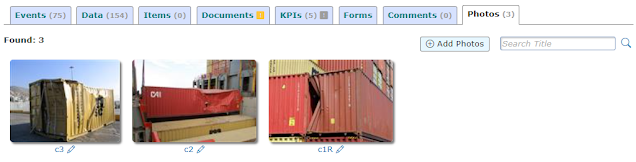
The title of each photo can be changed as required by clicking the title.


Enabling Photos Tab

To enable the 'Photos' tab on a Work Order, a couple of steps need to be taken:

1) Enable on Workflow - Go to Admin > Workflow Management. Select the Workflow you need to enable photos on. Go to the "WO Tabs" tab. Select "Photos" and click Save.


2) Enable Role Permissions - Go to Admin > Role Management. Select the Role Customisation tab. Select a role that you need to provide access to. Under Operations > Work Orders, scroll to the bottom and select the permissions needed.


As this is a new feature, we are eager to hear your feedback on this. Please let us know if you face any issues while using the Photos tab.


Saturday 9 September 2023

TrakIT for Canadian Freight Forwarders!

As we continue to navigate the evolving landscape of the logistics industry, embracing technology and innovation becomes essential. TrakIT is excited to share insights from a strategic market analysis in Canada, highlighting the immense potential for freight forwarders to streamline their operations and achieve unparalleled efficiency.


Canadian Market Insights

In our recent analysis, we discovered that the Canadian logistics industry is rapidly embracing digital solutions. With a robust and growing trade network, freight forwarders in Canada are seeking cutting-edge technologies to optimize their workflows, improve customer service, and stay ahead of the competition.


How TrakIT is Making a Difference

TrakIT, our comprehensive logistics workflow management software, is tailored to address unique challenges faced by freight forwarders. From real-time tracking, customized processes and automation to customizable reporting, customer/vendor portals and 24/7 accessibility, TrakIT empowers businesses to drive operational excellence and elevate customer satisfaction.


Key Benefits of TrakIT for Canadian Freight Forwarders

  • Completely customizable: Build your software functionality based on your business processes rather than the other way around.
  • Efficient Workflow and Automation: Streamline processes and reduce manual efforts, ensuring smooth and seamless operations.
  • Trigger any number of actions automatically at any step – Email, SMS, WhatsApp, hit an API, save to FTP, sending documents and much more.
  • Data-Driven Decisions: Leverage real-time analytics and dashboards for informed decision-making and strategic planning.
  • Global Connectivity: Stay connected and in control, anytime and anywhere, enhancing your reach and capabilities.
  • Increasing Operational Efficiency: Delegate all routine, repetitive tasks to TrakIT.
  • Custom Interfaces: Interface with port authorities, shipping lines, finance systems, GPS vendors or any other API-capable systems.


Join the Digital Transformation

Embrace the future of freight forwarding with TrakIT. Discover how our software can revolutionize your operations and position your business for success in the Canadian market.

sales@trakit.in 

Saturday 1 July 2023

Vendor Management & Billing

Did you know that you can ask your vendors to upload their bills directly in TrakIT? And you can approve or reject them? Let's take a look at how this can be done.


Vendor Expense Linking

A vendor is an entity that is providing services to your company. If you are using the finance module of TrakIT, then you register the expenses related to the shipment under the Job Finance page. These expenses (or disbursements) can then be linked to the billing party (vendor).

Below is an example of how income and expenses look.


The Entity column displays the billing party or vendor for the expenses registered. If a Bill has been received and/or validated, it is displayed under the Inv/Bill column.


Vendor Registration

If you would like to provide access to your vendor to be able to upload bills directly in TrakIT, you will first need to create a user profile and then link the user to the Entity that represents the vendor.

1) Go to Admin > User Management > External tab.

2) Create a new user. A welcome email with credentials will automatically be sent to the email address provided.


3) After creating the user, go to the Linked Entities tab and click 'Add Entity'.


4) Once the Entity is linked, you can switch to the Access Control tab to select which menus should be available to the user.


Vendor Portal

Once the vendor receives their credentials via email, they will be able to sign-in to TrakIT. On the Bills page, they will be able to add a new bill.


After creating the bill, the vendor has the option of adding more supporting documents or modifying the bill fields before finally submitting it.

The vendor can also see a list of all bills submitted and their approval status.


Approval & Rejection

Once the vendor uploads the bill, it appears under the Finance > Bills page as a Submitted Bill.


There are options to Accept, Reject or Delete the bill submitted by the vendor. On acceptance or rejection, an email is sent to the vendor notifying them of the same.

Once a bill is accepted, it can be used in the normal way by assigning expense accounts and then validating the bill.


For any questions or concerns, please contact the TrakIT Support team.

Friday 26 May 2023

Container Yard Management

TrakIT allows you to place containers in a container yard according to the standard bay, row, and tier system. But before you can do this, you must set up the yard correctly.

Setting Up the Yard

As the first step, the yard can be created via Admin > Masters > Warehouses & Yards. Click on the 'Create' button and enter the details for the yard. Make sure 'Container Yard' is selected as the type.


Once the Yard is created, select it to create one or more "Areas" within the Yard.


If there are areas where containers are just placed ad-hoc without the need for numbering the location, just select 'No Positioning' for the area. E.g. Stuffing/Un-stuffing Areas, Maintenance/Repair Areas, etc.

Once an area is created and selected, you will be able to define the structure of the area in terms of the number of bays, rows and tiers available in the area.


You may also select specific slots and disable the slots where containers can't be placed. Each slot is a twenty-foot slot where a 20' container can be placed. A 40' container will cover 2 adjacent slots.

Once the configuration is completed for all zones, you can place containers in the yard.


Placing Containers

Placing a container in a yard is simply a matter of entering the position code of the container. The position of a container is designated as Zone-Bay-Row-Tier. 

In the Work Order page with the container, open the WO menu and select Yard Position.


When a container is placed at a location, TrakIT will ensure that the location is valid according to certain rules:

  • A 20' container must be placed on the ground or on top of a 20' container only
  • A 40' container must be placed on the ground, on a 40' container, or on two adjacent 20' containers

Similarly, when removing a container, TrakIT ensures the container can only be removed if it is permissible to do so.

When a Work Order has a container that is placed in a yard, it is not possible to change the container number.

Reports for the complete container positioning can be created via Workflow, Advanced or Query Reports.


For any questions or clarifications, please contact TrakIT Support.


Thursday 4 May 2023

Invoice Reversal and Credit Notes

It may be possible that an invoice has been issued wrongly or with incorrect amounts. Once the invoice is posted to the finance system, it is usually not possible to reverse this process. In such a case, a Credit Note must be issued for correcting the situation.

Invoice reversal basically involves creating Credit Notes of the reversal amount. There may be two possibilities:


Reversing the Whole Invoice

In case, the invoice was issued wrongly and the entire amount needs to be reversed, TrakIT offers a shortcut way to reverse the entire invoice. There is a button 'Reverse Invoice' available on the Invoice page.


Clicking this button brings up the following popup:


After selecting the Credit Note template and reason for reversal, TrakIT will perform the reversal as mentioned in the steps. The reversal cannot be undone.

Invoice Reversal is just a shortcut to automate the whole reversal process. The same steps can be performed manually as well.


Reversing Invoice Partially Only

In case only a part of the invoice needs to be reversed, the user must do the following:

  1. Create one or more Income accounts on the shipment with negative values matching the amounts to be refunded.
  2. Create a new Credit Note under the Invoices tab and add these accounts to the Credit Note.
  3. Once satisfied with the Credit Note preview and amount, the Credit Note can be approved and finalized.


For any questions or clarification, please contact TrakIT Support.


Wednesday 8 March 2023

Analyse your Job Profitability

With the latest update of TrakIT, a new "Analyse" tab has been added to the Job Finance page. This tab allows users to view the summary of the shipment finance based on preset views.

The following views are available, along with an example of each.


Account Master Summary - The information is grouped as per the Account Masters. Each account master present in the accounts tab is summarised.


Account Category Summary - The information is grouped as per the category of the Account Masters. Each category is presented per row.


Work Order Profitability - This view displays the profitability of each work order in the job seperately.


Each of the views can be exported to Excel if required. 

For any questions or clarifications, please contact TrakIT Support.