Thursday, 3 May 2018

Customized Columns

With the latest update of TrakIT, it is possible to now customize columns based on header fields, events and data fields. This is applicable on the main operations, finance and invoice pages.

This customization can be done by the TrakIT support and can include custom fields as well as computed fields on the headers.

An example header is shown below:


Specific fields can also be chosen to be sort keys if applicable.

Customization can also be done for individual users as per their preferences.

For customizing the columns in your installation of TrakIT, please contact TrakIT Support.

Saturday, 14 April 2018

Automation with Event / Data Actions

With the latest update of TrakIT, workflow automation has taken a new dimension!

For every event or data field in a workflow, you can now define one or more actions that take place immediately, conditionally or at a scheduled time. These action can send out emails, chat messages or SMS messages for a variety of content types to customisable recipients.

Lets take a look at defining an action:

Creating an Action for an Event or Data Field

Go the Admin > Workflow and select a workflow. Click on the Detail icon for the Event or Data field you want to define the action for. You will see a new tab: Actions.


Click on 'Add Action'. You will be required to define the details of the action. You may define any number of actions for each event or data field. The details for each field is give below:

The Action Trigger

This defines how the action is triggered. There are three options available:

On Change - The action is triggered whenever the Event or Data field changes. It is triggered on any change, even NA or TBA or blank values being entered.

On Condition - The action is triggered whenever the value of the Event or Data field changes and a pre-defined condition is met. You will need to specify the condition. 'Value' must be used to test the condition. For example, you can specify the condition as: VALUE='Truck' or VALUE='Train' . In this case, the action will be triggered only if the Value of the field matches Truck or Train. Conditions can be complex as well. Please contact TrakIT Support if you have queries on this.

On Date/Time - The action is triggered a pre-set number of hours before or after the time specified in the Event of Data field (For Data fields, this is applicable only for Date fields). You can specify the number of hours before or after the event, the action must take place. For example, you can trigger the action 24 hours before the ETA of a vessel or truck, or 48 hours after Delivery of Goods.


Action To Take

This defines what action is to be taken. There are three self-explanatory options available. More options will be added in the future. For sending SMS messages, your TrakIT installation must be configured to send messages through your SMS gateway. You may need to define one or more SMS templates in Admin > Master Tables > Message Templates. Please contact TrakIT Support if you need to configure this.

Content Type:

Once you've selected the action to take you can define what must be sent. Depending on the option selected for Action to Take, you will have a number of options available.

Simple Message - You will be able to specify a simple message to be sent. Some placeholders are available as shown.
Message Template - You will need to select a message template defined in Admin > Master Tables > Message Templates
Form PDF  - You will need to select a pre-defined form. The form will be automatically generated and attached to the email as a PDF.
Form Text, HTML - You will need to select a pre-defined form. The form will be automatically populated and inserted in to the email as plain text or as an HTML based email.

Recipients

Based on the Action, you be able to define multiple recipients or select one or more entities from the work order whose event/data field caused the action.


In case of SMS Messages, you can specify phone numbers directly as long as they are preceded with a plus symbol (+) and the country code. Example: +91-9876543210

TrakIT will extract the phone number or email from the selected Entity as needed.


How the Action Applies

When you create an Action - it will affect only those events or data fields that are saved after the action has been created. The action takes place based on the trigger defined.

You can see the details of individual actions under the Event or Data field details by clicking on the 'i' icon next to the event/data name in the work order.


------------------------------------------------


Actions are very powerful tools for automation. Please contact TrakIT Support for assistance. And as this is a new addition to TrakIT, please do let us know about any issues, bugs or unexpected behavior and we will resolve them asap!

Thank you for your support!

Wednesday, 28 March 2018

Asset Management in TrakIT

With the latest update of TrakIT, we have added a new Asset Management module to help you manage your assets used for work orders in a more systematic way.

The first step is to define the types of Assets for your organisation. Any number of Asset Types can be available. For e.g. Trucks, Trailers, Drivers, Products, GPS Units, Ships, Office Equipment, Forklifts and so on.

In the example below, we have 3 assets types defined. Please contact TrakIT Support with the list of Asset Types you would need in your TrakIT installation.


Each Asset Type can have Categories as well as Fields that are defined in Admin > Master Tables > Assets Master. Select an Asset Type and create the categories and data fields for the Asset Type. The Data fields for the asset are similar to the Data items created for a Work Order. There is no limit on the number of Data fields for an Asset Type.

Once you have created the categories and data fields for each Asset Type, you can open System > Asset Management to add assets.


All the assets will be listed as per the Asset Type selected. You can search for assets using the filters provided. 

To view the details of any Asset, click on any asset from the list. The Asset Detail page will open:


If you want to link this asset to any other asset, click on the plus icon and select the Asset Type and Asset Name where this asset needs to be linked. For example: a trailer and driver can be linked to a truck. All the linked assets will be listed under 'Linked Assets' tab.

All the Asset data will reflect under 'Asset Data' tab, more fields can be added here by adding them in in Assets Masters under Master tables.

Adding Assets to Work Orders

Assets can be linked to work orders in TrakIT. In order to achieve this, you must first enable Assets in the Workflow definition. Go to Admin > Workflow Definitions. Select a workflow, modify the header and enable Assets.

Once this is enabled, an 'Assets' section appears under the Header section on a work order. Click the icon to add a new asset. Select the Asset Type, Asset Owner and the Asset. The selected asset is displayed in the Asset section. Any number of assets can be added on the work order. When an asset is added to the work order, any other assets linked to the asset are also added at the same time.


Details and Fields of assets that have been linked to work orders can be exported in Advanced Reports and Forms.

Assets also support location updates via APIs. For more information on updating Asset Locations, please contact TrakIT Support.

We will be adding more features to Asset Management in the future. If you find any issues or have suggestions or feedback, please do let us know.

For any questions or concerns, please contact TrakIT Support.

Friday, 23 February 2018

Introducing TrakIT Chat!

With the latest update of TrakIT, we have added TrakIT Chat to ease information sharing and communication process between users.

You must have noticed a message indicator on the bottom left side of the main TrakIT window. When you receive a new message or messages, the indicator starts flashing with the number of messages received.


To open TrakIT Chat window, click on the message indicator. The below window opens:


All the internal users will be listed on the left side of the window. Count of users who are online on TrakIT Chat will be shown above the list of users. You can search of any TrakIT user with there first/last name as mentioned in the list. A green light () next to a user means that the user currently has the TrakIT Chat window open. A yellow light () indicates that the user has TrakIT open but the Chat Window is not open. The gray/off light () indicates that the user it not using TrakIT.

To start a chat or view messages from a user, just select the user to view the conversation with that user. Enter the message in the message box and you can start or continue your conversation.

If you want to link any work order, enter it's 11-digit container number or enter the work order number in the format WOxxxx (e.g. WO12345 or TMPU1234567). TrakIT will automatically recognize the container number or work order and add a reference link to the work order (as shown in above screenshot).

We will be adding more features to TrakIT Chat in the future (including receiving System Notifications and Alerts). If you find any issues or have suggestions, please do let us know.

For any questions or concerns, please contact TrakIT Support.

Wednesday, 24 January 2018

Populate Data when creating new shipments

With this latest update, you can now notice the new 'Data' tab when creating new shipments. This tab gives you an easy way to update the shipment details that you already know.

Only those Data fields that apply to the Shipment will appear here. Data fields that are work order specific will not appear here.


An important point to note is that there may be validation rules in place for the Data items. If any of the values entered fail the validation, they will not be added to the work order(s) created and there will be no notification for the same. This validation cannot be done prior to the creation of work orders as there may be complex rules dependent on the work order parameters.


For any questions or concerns, please contact TrakIT Support.


Monday, 18 December 2017

Delivering Reports By FTP

Among the custom development we do for our clients, we have had a few cases where reports were needed to be delivered to a server using the File Transfer Protocol. These were implemented as customized development for those who required it.

With this latest update, you can now deliver reports (any format) to a specific FTP location by specifying the credentials for the location.

FTP is available only with Advanced Report Subscriptions. To setup FTP delivery for reports, select 'FTP' under the 'Delivery Mode' option.


When you select FTP, the options for FTP are displayed: FTP Server URL, FTP User/Password and FTP Options. Fill up these settings as required.

TrakIT will validate the FTP server when saving the subscription. If the FTP server is not available at the time of creating the subscription, just select the 'Bypass FTP Validation' checkbox to enable TrakIT to save the settings without checking if the FTP server exists.

The report is delivered in the format specified and as per the time schedule.

For any questions or clarifications, please contact TrakIT Support.

Saturday, 14 October 2017

Introducing the Shipment View Window

TrakIT has been so far oriented towards work order operations. With the latest update, we've added a "Shipment Window" that displays the shipment header and all work orders within the shipment.

Individual work orders can be opened directly by clicking on the numbers. Multiple work orders can be selected and various operations can be performed on the selected work orders by clicking the 'Action' button.


The above window can be opened from the Operations page by clicking on the T/D number directly.

We will be adding more functionality to this page over the next few updates.

For any questions or concerns, please contact TrakIT Support.

Friday, 15 September 2017

Events and Data based on Shipment Types

With the new update of TrakIT, Shipment Types can be linked to Events or Data in a workflow. This means that you can customize the events and data in a work order based on the Shipment Type.

Events & data can be linked to one or more shipment types. Events or Data items that are not linked to any shipment type will always be included in a work order (provided there are not other conditions that prevent inclusion).

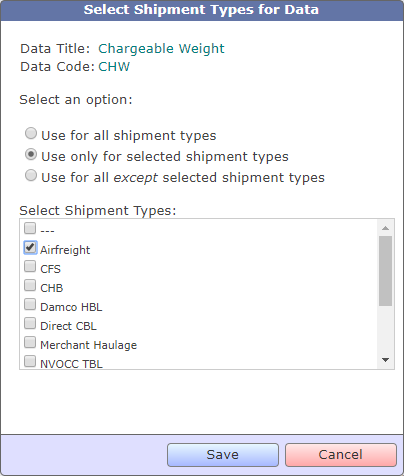
Below are the options that you get while selecting the Shipment Type:


In above example, the Chargeable Weight data field is linked to Airfreight. At the time of work order creation, if these shipment type selected is not Airfreight, then the field will not appear in the work order. You can check the 'Shipment Types' column in a workflow, as displayed below:


A user may change the shipment type selected for an active work order at any time - however, this may lead to some events being removed or added when the work order is reset, so it must be done very carefully.

For any further questions or clarifications, please contact TrakIT Support.

Saturday, 12 August 2017

Workflow and other Updates

With this update of TrakIT, we have made some significant changes to enable future development or requested features. Here is a summary of  the changes.

Workflows


As previously notified, Corridors are now called Workflows. This was done to enable TrakIT to track non-shipment related Workflows or processes in an organisation that are not related to Shipments. This could mean just about any workflow - contract management,  employee on-boarding, crew sign-on/sign-off, audit processes, and many more.

In the near future, we will be introducing a new type of Workflow Type called 'Non-shipment' in addition to the Import, Export and Round Trip workflows. This workflow will have a significant number of header fields related to shipments removed from work orders. The  Event and Data for the workflow will remain the same.

Shipper/Receiver


Previously, TrakIT had just one field to store the "Shipper/Receiver" in the work order header in addition to the Contractual Customer. Now, due to demand, the Shipper and Receiver fields have been separated and both can be filled independently. Please note that your primary customer for the shipment is always the Contractual Customer.


All workflow logic (such as customized events) and shipment notifications are always sent to the Contractual Customer. The Shipper and Receiver  are available for export in reports and forms as well. For older work orders, both the Shipper and Receiver fields have been set to the same value as the previous "Shipper/Receiver" field.

HTML in Email


For Workflow Reports and Advanced Reports, if you select the subscription format as HTML, you will  have an option to include the HTML content directly in the email instead of as an attachment. To do this, simply select the option 'HTML in Email' when creating or modifying the subscription. Obviously, this option cannot be combined with the 'Zip Report' option.


Shipment Creation Graph on Dashboard

A new type of chart is available on the Dashboard - Shipments created each month. This chart is the same as the Work Order Creation chart, except that it counts Shipments instead of Work Order.


As always, please contact TrakIT Support for any questions or concerns.

Friday, 28 July 2017

Data Values : New search option

With the latest update of the TrakIT, we have added 'Data Values' search field on the filter panel. This replaces the Vessel and Voyage filters.

The Data Values filter searches any of the Data fields values in work order. Use comma to enter separate text of which any can match.You can enter maximum 5 words in the search box.

For example, the below filter will find all work orders that have "ABC" or "123" exactly in any Data field.


This search option is available on both the Operations page and Finance page filter panel. Once you enter any values in the search box, it will remember the values until you remove them from the box or clear all filters.

For any questions or concerns, please contact TrakIT Support.

Monday, 10 July 2017

Where is my Truck?

With the latest update of the TrakIT Android app, we have added location tracking to the app. This means that you can enable location tracking for any TrakIT user who is using the TrakIT Mobile app.

So how does this help you know where your truck is? This can be done in 4 simple steps:

1) Specify the Tracking Start and End events in the corridor setup.
2) Create a user profile for your truck drivers and enable location tracking on their profile
3) Have each driver download the TrakIT Mobile app on his Android phone and login once only.
4) Link the relevant work orders to the drivers.

The first 3 steps are to be completed once only. However, each work order needs to be linked to the correct driver so that the location for the work order can be tracked.

Once linked to a driver, location tracking for a work order will happen only between the events that are specified in the corridor setup (e.g. From Gate-Out Port to Delivered to Customer). The latest location reported by the driver between these two events will be displayed on a map as shown below:


Please note that only the latest location based on the location time between the events is reported.

For any questions or guidance on how to setup Location Tracking, please contact TrakIT Support. Kindly note that as this is a new feature, we are still testing this on a variety of Android phones and checking compatibility as well. It may be possible that it may not work on some Android phone models.

Wednesday, 17 May 2017

Login with Social Media accounts

With the latest update of TrakIT, we have introduced different login options for the TrakIT users as well as your customers. 

The user login now allows you to login either with your credentials (User ID or Email) or with the social media logins.


You can enter your TrakIT User ID or Email address and password to login. The email address should be the same which is mentioned in your user profile in TrakIT.

Once you click on any social icon, it will ask for your permission to allow access using your social media account, click on 'Allow Access' (if you are already logged in to your social media account).

For any questions or concerns, please contact TrakIT Support.

Friday, 12 May 2017

Revenue Recognition Date for Shipments

With the latest update of TrakIT, a new field called "Revenue Recognition Date" has been added to the Shipments. This date automatically populated when a specific event is populated in the shipment.

The trigger event is defined in Corridor Definition where one specific event code is set as the trigger event. The event code used should be present in the Work Order Event list of that corridor and should be a "Required Event" with the "No NA Allowed" flag set. Services cannot be linked to this trigger event.


When the event has not been populated, the Revenue Recognition date is set as Pending. If the shipment has the event not set on all work orders in the shipment, the date is set as Partial. Once all the dates are set, the latest date is used as the Revenue Recognition date.

The field is available for export in all Reports under the Header section. It can also be added to any form if required.

For any questions or concerns, please contact TrakIT Support.

Wednesday, 26 April 2017

Cargo Type for Shipments

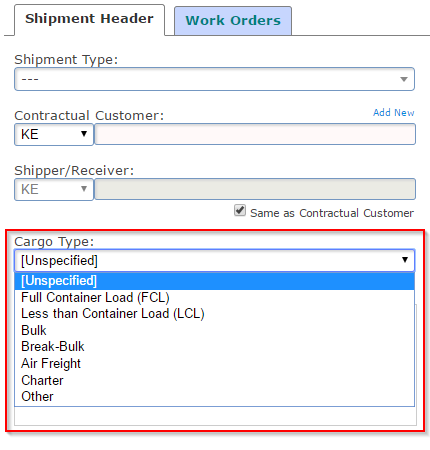
With the latest update of TrakIT, a new field called "Cargo Type" has been added to the Shipment Header. This field is a fixed list of the following options:
  • Full Container load (FCL)
  • Less than Container load (LCL)
  • Bulk
  • Break Bulk
  • Air Freight
  • Charter
  • Other
When creating a shipment, the Cargo Type field is displayed as shown below:


The field is initially set as [Unspecified] and you can select one of the cargo types available. When Bulk, Break Bulk, Air Freight and Charter is selected as the Cargo Type, the container number fields gets disabled.

The Cargo Type field is not mandatory by default, but it can be made mandatory for specific corridors by selecting the field in the Corridor Definitions > Mandatory Header Fields section.

The field is available for export in all Reports. It can also be added to any forms if required.

For any questions or concerns, please contact TrakIT Support.

Tuesday, 11 April 2017

Auto-generate B/Ls

With the latest update of TrakIT, you can now auto-generate Bill of Lading numbers (Transport Documents) with pseudo-random alpha-numeric text. These numbers are unique and non-sequential.

To use this feature, modify the corridor definition and select "Auto Generate T/D" as shown below:


When this option is selected, the T/D number is generated automatically on the Create New Shipments page.


If the number is not suitable (for any reason), click on the "Re-generate" link to generate a new one. Each number is 10 characters long.


For any questions or concerns, please contact TrakIT Support.

Thursday, 19 January 2017

Update on the TrakIT Android App

An update for the TrakIT Android app has just been released with two new great features:

Scan a Number

The app now provides you a way to scan a container number or any number for that matter. The option is available in slide-out main menu.


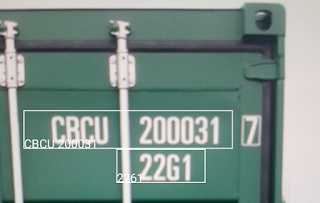
Upon clicking 'Scan Number' on the menu, the app opens the camera (provided permission is given), and you can scan any number. Upon recognizing number(s), box(es) will be displayed over the number(s). Tap on one of the boxes, and the app will enter the number directly into the Search Box and perform a search for the number.


Note: The scanned number cannot be longer than 20 characters. Please note that number recognition may not work in all cases depending on the clarity of the image, lighting conditions, angle of camera and other factors. In such cases, please enter the number manually.

Update Work Order Events & Data

You can now update or edit Work Order Events and Data using the app. Just tap on the desired event or data field to activate the popup.


If you have any questions on how to use TrakIT Mobile app, please contact TrakIT Support.

Sunday, 20 November 2016

Scanning QR Codes and SMS Notifications

Scan QR Code

A new version of the TrakIT Android app has been released with the capability to scan QR Codes created in TrakIT. The option is available in slide-out main menu.


Upon clicking the 'Scan QR Code' button, the app opens the camera (provided permission is given), and you can scan the QR code displayed. Upon recognizing the QR Code, the app directly opens the associated work order in the app.


SMS Notifications

TrakIT can now send out SMS notifications to customers when events visible to the customer are updated in work orders. To enable SMS for customers, you need to add 'External' users along with their mobile numbers and link them to the customers. Linking them also gives those users to access TrakIT directly in the browser and view their shipments.


Please note that an SMS gateway must be enabled and accessible for your company for TrakIT to use SMS functionality. If you  have any questions on how to enable SMS notifications, please contact TrakIT Support.


Monday, 24 October 2016

Tax Exemption and Tax Withholding

In many instances, you may have customers who are exempt from paying taxes on Invoices. Until now, TrakIT could not remove such taxes from invoices. With the latest update, we'd added options for you to set the Tax Exemption and Tax Withholding status for customers and other entities.

From System > Entity Management, click and Entity to open the Entity Details page. Select the Tax Status tab.


You can select both the Tax Exemption Status as well as the Tax Withholding Status for specific taxes. Only users with roles "Finance Admin" can do this.

When generating an invoice for a customer, if the customer is exempt from a specific tax, the tax will be marked as "exempt" and not be included in the Invoice total.

For any questions or concerns, please contact TrakIT Support.