Thursday 9 October 2014

TrakIT bids good bye to Internet Explorer 7

It's been coming a while and we've finally disabled IE 7 support for TrakIT. TrakIT will now refuse any user who is using any browser that identifies itself as IE 7 or earlier.

IE 7 and earlier browsers are known for extremely buggy behavior that require countless developer hours to make simple page layout work properly. Even later browsers (IE 8 and 9) can use compatibility mode that makes them behave like IE 7. This mode can be set by default for Intranet sites.

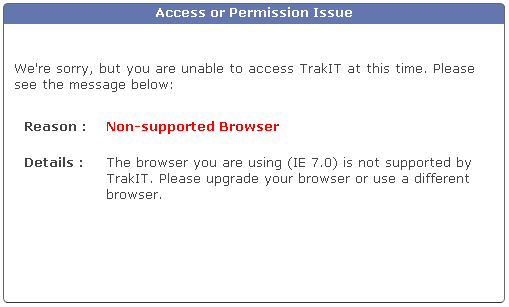
If you are using IE 7 or earlier, or your browser is reporting itself to be IE 7, you will see the below message when you try to open TrakIT:


To resolve this, please upgrade your browser to a later version. If you are already using IE 8 or later and are still seeing the above message, please switch off compatibility mode. Go to Tools > Compatibility View Settings and un-check "Display Intranet Sites in Compatibility Mode". See image below:


If you are still having any issues with your browsers, please contact TrakIT Support and we will assist you immediately.


Monday 1 September 2014

Work Order Creation Notification

Up till now, users could receive email notifications when Events/Data fields or KPIs were updated or documents were uploaded in TrakIT. With the latest update, you can now receive email notifications when new work orders are created in selected corridors.

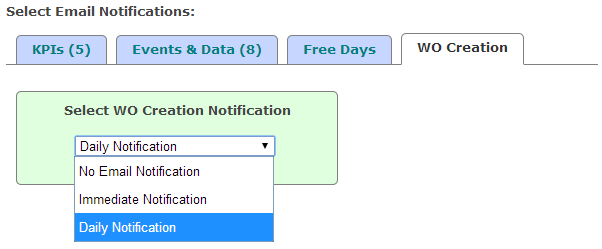
Go to System > Email Notifications and select the appropriate corridor. Click on the 'WO Creation' tab. The following will be displayed:


Select from the 3 available options: No Email Notification, Immediate Notification and Daily Notification. Immediate Notification will enable users to receive an email notification within half an hour after the work orders are created. Daily Notification will enable users to receive a single email notification at about 5am UTC. This email will include notification for all work orders created for the selected corridor(s) since the last notification.

Administrators can also select users to receive WO Creation notification emails for their corridor. Go to Admin > Corridor Definitions and select the appropriate corridor. Select the 'Work Order Creation Notification' option as shown below:

Now click on Add User. A new dialog box will open up as follows:


Type in a few characters of the user's name whom you wish to notify, select the user from the list of users, select the type of notification and click on Add.

For further queries, contact TrakIT Support.

Friday 15 August 2014

Advanced Reports get more advanced

Advanced Reports have been greatly improved with the latest version of TrakIT. A number of options offering finer control over report generation have been introducded.

Alignment, Separators & Sorting
Users can now add various formatting features at field level. When creating or modifying a field, 3 new options have been added, as shown below:


Here is an explanation of the fields:

Alignment: Users can now choose or force the alignment for every field in the report for greater legibility. Fields can be left-justified, right-justified or centre-aligned. If no alignment option is chosen for a field, the formatting may be differ based on the type of data. For example, Excel will align numbers to the right and text to the left by default.

Separator: Data displayed in the reports can be grouped or separated in two ways:
  • Select 'Group' option if you want the data grouped by a specific field. The field appears as a full row and is removed as a column. Sorting on this column takes precedence over other fields.
  • Select 'Sheet' option if you want to completely separate the tables based on a specific field. In HTML, the table is split into several tables. In Excel, several sheets can be created based on the field value with each sheet representing one value of that column. The maximum limit of sheets in 100.

Sort Priority: Users can select up to 3 levels of sorting for their reports. For any field, they must select the sort order as appropriate: 1st, 2nd or 3rd. Report fields will be displayed as per the sort order.

These formatting options used on report fields will reflect across all subscriptions. Please note that these formatting options have no effect whatsoever on subscriptions where the Report Type is CSV. CSV, by definition, cannot contain formatting information.

Highlighting updated Events/Data
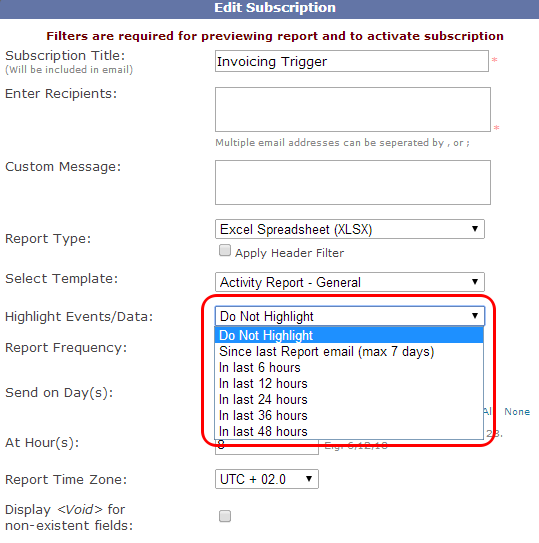
Another feature added is the ability to highlight events or data fields in the report that have changed recently. This can be controlled for each subscription. When creating or modifying a subscription, you can choose one of the options shown below:


If selected, the relevant fields are highlighted in a light red color. If the first option "Since last Report emai" is chosen and the last report email was sent more than 7 days ago, no fields will be highlighted. This feature is only valid for Event and Data fields and not applicable to Header and KPI fields. Again, this highlighting will not work for CSV reports.


For further assistance or queries, contact TrakIT Support.

Thursday 7 August 2014

Kewill Import for Damco

Note: This article is valid only for Damco TrakIT users

TrakIT can now import shipments from Damco's Kewill Freight Forwarding system (KFF) using a specially designed Excel template. This enables users to create and update shipments in one go.

Shown below is what the Kewill TrakIT Template looks like:


Users simply need to fill up the excel file with their shipments. TrakIT will automatically create new shipments (work orders) or update existing shipments. Each line in the excel sheet refers to a shipment and not a work order. Thus, each line in the excel sheet can create or update one or more work orders with the relevant data.

The Excel template has the following fields. An explanation of the fields is also provided on the second sheet, titled "Guidance", in the work book.

Corridor Code: Specify the Corridor Code here as it exists in TrakIT. New work orders that are created, will belong to this corridor.

Customer Code: The code specified here must match the customer code as defined in TrakIT. The Shipper/Receiver field of new work orders will be assigned to this customer.

Kewill Booking Number: The booking number specified here will be assigned to the new work orders.

Container Count: Specify the number of containers/work orders to be created (or updated) here.

Transport Document: It must be provided if present in KFF. If left blank, an auto generated number prefixed with 'TBA' will be assigned.

Carrier Code: Provide a code that exists in TrakIT.

Container Numbers: Enter comma separated container numbers here, otherwise auto-generated numbers prefixed with 'TBAU' will be assigned to the work orders. The number of containers here must match the Container Count column.

Container Types: Provide comma separated values for container type codes here. The number of codes here must match the Container Count column.

Shipment Type: The specified shipment type will apply to all new work orders being created.

Commodity: Specify the commodity that will be assigned to all work orders.

Shipper Code: This field (if available in the Work Order Data) will be filled with the value provided here.

Consignee Code: This field (if available in the Work Order Data) will be filled with the value provided here.

Kewill Export Job Number: This field (if available in the Work Order Data) will be filled with the value provided here.

Kewill Import Job Number: This field (if available in the Work Order Data) will be filled with the value provided here.

All the fields are not mandatory. Specifying only mandatory fields will also suffice.

Once the Excel template has been completed, just email it as an attachment to trakit@damco.com with subject as TrakIT Kewill Import. After a few minutes, you will receive a response email from TrakIT with the result of the import for each line in the Excel sheet.

For further queries or assistance, please contact TrakIT Support.


Monday 21 July 2014

Workflow Instructions for Event and Data fields

Among a number of minor changes and fixes, a new feature has been added in the latest update that was released yesterday. Workflow Instructions enables users to receive instructions for events/data by email shortly after they have been populated or updated.

Administrators can set up these instructions for each event or data item in their corridors and also select the recipients for the instructions.

In Admin > Corridor Definitions and select the corridor for which you wish to set up event workflow instructions. Under the Work Order Events/Data tab, click on the menu icon for the desired event/data and select "Workflow" option, as shown below:


The following popup appears once you select the "Workflow" option:


In the 'Select Users to Notify' box, enter the names of the users whom you wish to notify about the workflow instructions and under the 'Specify Workflow Instructions' box, write the workflow instructions for the users (which can be up to 500 characters). The selected users will be informed about the workflow instructions and the work orders in which this event has been updated/modified.

For further queries please contact TrakIT Support.