Friday, 23 September 2022

Upcoming Changes to Advanced, Query and Workflow Report Access

TrakIT has the capability to allow users to build a wide variety of reports and automate the delivery of these reports at their convenience. Currently, such reports are accessible to all users who have access to the relevant workflows or companies.

With data security becoming an ever-increasing factor in online systems, and to keep TrakIT up to date with security and compliance requirements, access to reports will be changed in a series of updates.

The main changes to be implemented are listed below:

1) Report Owner

Every report will now belong to a user called the "Report Owner". A report will be accessible and modifiable only by the Report Owner or a System Administrator. This user shall be the responsible person for the report - this includes creation, adding fields, modifying subscriptions, setting recipients, etc. No other user (except SysAdmins) shall be able to make any changes to the report.

The creator of a report shall automatically become the owner. The owner (or SysAdmin) may also transfer the ownership of a report to another user.

Changes requested by a user for a report shall have to be approved by the Report Owner or a SysAdmin.

2) User Access Control - Manual Reports

For reports that are generated manually, the Report Owner must provide access to other users to be able to download/preview the report. Such access can be granted or revoked as needed to specific users. Users with access can only generate/download the report. No changes can be made to the report itself.

Access will be granted to users at the subscription level.

3) Report Recipients - Scheduled Reports

For scheduled reports, the Report Owner may add any number of recipients that will receive the report. These could be internal users/emails or external email addresses. Permission to add external recipients shall be controlled through Role Management.

4) Responsibility

The Report Owner shall be responsible for the data generated by the report and its security - allowing users access to download the report or adding users as recipients.


Please note that the above changes will be implemented in the next one or two weeks. If you have any questions or concerns about accessing your reports in the future, please connect with TrakIT Support.

Sunday, 4 September 2022

Send Supporting Documents with Invoice

With the latest update of TrakIT, you can now attach supporting documents when sending an invoice to your clients.

This can be done for both Pro-forma and Final invoices. When generating a Pro-forma invoice or final invoice, you can select one or more documents on the right-side panel. A maximum of 10MB files can be selected.


Supporting documents are listed from the shipment, invoice documents or WO documents linked to the invoice accounts.

For any questions or clarifications, please contact TrakIT Support.


Thursday, 11 August 2022

Shipment to be renamed to Job

Dear TrakIT Users,

As you may be aware, workflows in TrakIT can track any business process in your organization. They are not just limited to shipments only. For example, there could be workflows related to internal Finance, HR, or Sales processes. 

With the increasing use of non-shipment workflows in TrakIT, the word 'Shipment' does not apply to a significant number of workflows for our clients. To solve this, we have decided to make a small adjustment.

There will be a change in terminology in an upcoming update for TrakIT. These changes are listed below.

  • Shipment to be renamed to Job
  • Shipment Type to be renamed to Job Type
  • Shipment ID to be renamed to Job ID

Furthermore, the application may refer to Job Ops or Job Finance referring to the operational and finance parts of the job. These changes will also affect the client portal and the TrakIT Android app.

Existing reports that have Shipment related fields will continue to use the same field name. If you would like these changed, you can rename the fields yourself or ask us to do it.

If there are any questions or clarifications, please contact TrakIT Support. We apologize for the inconvenience or confusion caused (if any), but we believe this will allow far greater benefits for our clients to be able to utilize TrakIT for many other non-shipment workflows as well.
Saturday, 30 July 2022

Multi-currency capability in multi-company shipment

Previously, if a shipment was being handled by multiple companies or countries, both companies or countries had to use the same base currency for the shipment. This base currency was defined as the Workflow Currency. Even though alternate currency amounts could be added and invoicing could be in a different currency, the base currency remained the same.

With the latest update of TrakIT, it is now possible for companies in different countries to work on the same cross-border shipment and use their own preferred currency as the base currency.

When a new shipment is opened in the Finance module for the first time, a currency is automatically assigned to the shipment for the company selected. This currency is copied from the workflow currency. If the company has a default currency, then the default currency will be assigned instead of the workflow currency.

The currency selection is available right next to the company selection on the Finance view.


The currency can only be changed if there are no accounts in the estimates stage (i.e. the Finance Status is set to 'Empty').

Changes to the currency are logged to the Audit Log. If the currency needs to be changed after accounts have been added, all accounts must be deleted before the currency can be changed.


For any questions or clarifications, please contact TrakIT Support.


Thursday, 16 June 2022

Activities

With the latest update of TrakIT, a new page called "Activities" has been introduced under the Workflows menu.

With the help of this new feature, you will be able to create tasks and activities as well as set reminders for the same.

This page can be accessed via Workflows > Activities.


Creating a new Activity:

Option 1:

Click on "New Activity" button.

Option 2:

To create a new activity for a specific entity, go to System > Entity Management > Select Entity > Activities Tab and click on the "Add Activity" button.

New Activity screen will appear as shown in the below image. As per your requirement, fill in the details and click on the "Create" button.


Kindly note, the list of "Activity Type" can be customized as per your requirements.


Permission / Role Access:

Access to this page depends on the permission granted. This can be managed through Admin > Role Management. 


Activities Page: Workflow > Activities

This page gives all the details of the activities for the user's company. However, the user can only modify/complete activities assigned to the user.


The "For" column displays the entity name for which the activity is created.

The activities can be filtered based on the various filtering options available.  Details can be downloaded by clicking on "Export" button.


For any questions or clarifications, please contact TrakIT Support.


Monday, 23 May 2022

Changes to Assets Module

In an upcoming update of TrakIT, please note that we will be linking assets with companies.

Note the following points carefully:

  • Each asset will belong to a company (even if it is a third-party asset)
  • Users (except SysAdmins) will only be able to see assets for their primary company and any additional companies they are assigned to
  • The initial company for each asset will be based on responsible users / asset creators company
  • Asset Types, Asset Categories and Asset Data will continue to be global and available to all companies
  • ​While adding assets in Work Order it will list only those assets which belong to user's assigned company(s)


For any questions or concerns, please contact TrakIT Support.

Wednesday, 18 May 2022

Introducing Events & Data

With the latest Update of TrakIT, a new feature to manage "Events & Data" is provisioned. It helps you to perform a search for any event or data using given filters. It can show you the results across all workflows or for a specific Transport Document / Work Order / Container / Event / Data / as per value of the Event / Data. In the background of workflows, it also provides the flexibility to define the event/data ownership and due date which is dependent on any specific event(s) date. By having it defined it allows you to track and monitor which all events/data are overdue or overdue within 2 days or 5 days. 


Viewing Events & Data

You can navigate to it from Menu Workflows > Events & Data

It will show you below screen wherein you can make use of different filters to track and update events/data in a timely manner. It helps you to inform responsible owners about events/data which are overdue or getting due in a few days. You can download the list of such events/data simply by clicking on the export button. The access to view and update events/data is controlled by events & data permissions. 


Define the Event/Data Ownership

You can define the Event/Data Ownership by navigating to Admin > Workflow Definitions and follow below steps:

Step 1: Switch to Event/Data Tab 

Step 2: Click on any specific Event/Data wherein you can edit it by clicking on the
pencil icon
Step 3: Refer to "Owner Role" dropdown to define the Ownership, as shown below:


Define the Event/Data Due Days

You can define the Event/Data Due Days by navigating to Admin > Workflow Definitions and follow below steps:

Step 1: Switch to Event/Data Tab 

Step 2: Click on any specific Event/Data and then switch to "Due Days" Tab as shown below:


Step 3 : Click on "Add" button, it will populate below screen, wherein you can select the dependent Event and Offset Days as target for the completion of an event/data.


On "Events & Data" Page the "Event/Data Due Date" Filter (as shown below) works based on the defined due days against the events/data in the workflows (as shown above).


For any questions or clarifications, please contact TrakIT Support (support@trakit.in). We welcome feedback and suggestions for this new feature.


Friday, 6 May 2022

Introducing Quotations

With the latest update of TrakIT, a new module for Quotations has been introduced under the Finance menu.

The Quotations module allow you to quickly create a quotation for a customer before even creating the shipment. After approval, the quotation can be generated on a PDF file and sent to the customer at the click of a button. You can finalize the quotation or revise it any number of times.

Viewing Quotations

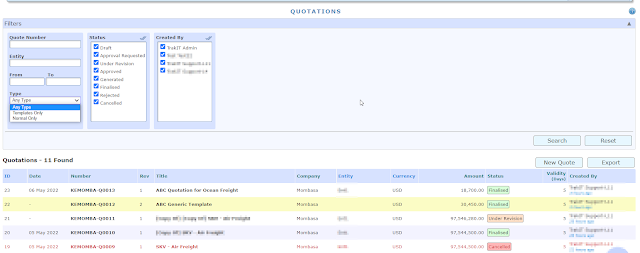
Go to Finance > Quotations to get access to all quotations for your company or companies that you have access to. You can filter quotations using the filters provided or create a new quotation.


Yellow highlighted row indicates that the quotation is a Template. Cancelled quotations are displayed in Red. 

The list can be downloaded in the excel format by clicking on Export button.


Creating Quotations

To create a new quotation click on the New Quote button. 

Quotation can be of types 'Normal' or 'Template'. The major difference is that if the quotation is of 'Template' type it cannot be generated but can be replicated to create new quotations, thus saving time to create them from scratch.

Note:
  • The title of two quotations cannot be same within the same company.
  • By default the primary company is selected of the user. In case of multiple company access, select the required company from the dropdown.
  • Internal Remarks can be seen on the Quotation details page.
  • External Remarks and Terms & Condition can be printed on the quotations.

As shown in the below image, fill in the details as per the requirement and then click on the Create button.


On creation, the quotation is initially in the draft status and the revision is indicated as 1. The Quotation can be replicated, edited or deleted.

To add accounts click on the Add button and fill in the details as indicated. Below image for your reference.


After adding the account click on the Request Approval or Approve button as per user access. On approval, you see as per the below image that the status is updated to approved. On Revision, the Revision count will increase by 1. 


Generation of Quotation

1.Pre-requiste:  In Form Definitions, under Finance tab, create a form template with sub-type "Quotation". 

2. Click on the Generate button as shown in the above pic, and from the drop-down select the form templates available as indicated in above point 1. If the quotations need to be emailed, select the checkboxes as required.

3. Click on the Generate button.

After Generation of Quotation

To view or download the pdf, go to Documents tab and click on the respective icons. The 'R1' in the file name indicates the revision number.


External files can also be added here, by clicking on the Add Files button.

The work flow of a Quotation is as depicted below.


Notification emails are sent to the users having access or users selected under Notify Users field on each status change.

Quotation Permissions

The relevant permissions for user roles must be allocated for various actions possible with Quotations. This must be granted by System Administrators at Admin > Role Management > Role Customisation.


For any questions or clarifications, please contact TrakIT Support. We welcome feedback and suggestions for this new Quotation module.


Tuesday, 5 April 2022

Business Intelligence and Dashboards

In today’s data-driven environment, business dashboards are a must. You can stay aligned on responsibilities and goals with everything you and your team need to know and do in one place.

You can keep track of your KPIs, warehousing storage, CRM / leads milestones, top entities and much more. With the help of RAG feature, you can learn the number of shipments/perishable stock which are within the timeline, are delayed or within the buffer period and which are way out of the timeline and needs immediate attention.


A example of a User-Specific Dashboard with RAG feature


TrakIT helps you to make profitable and productive decisions with their customizable dashboards. Dashboards can be filtered based on customers, specific milestones, user specific conditions and so on. Reports and underlying data can be downloaded in the excel format whenever needed.


 An example of KPI Performance Tracking


TrakIT dashboards are user-friendly, easy to manage, customizable as per business needs.


Thursday, 24 February 2022

Depot Data Type

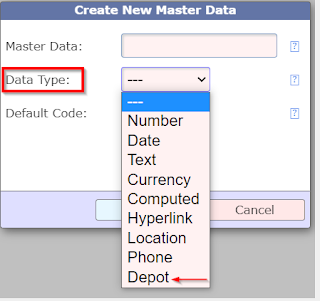
With the latest update of TrakIT, a new workflow data type for Depots has been introduced.


The field with this data type can be included in the workflows when the value of this field could be a depot name.


As shown in the above screenshot, search for the depot and select the required depot name from the list.

Kindly note the list will display only those depots which already exists in the TrakIT system. The new depot can be added to the TrakIT system through Admin > Geography & Access.

Like any other data field this data type’s field can be included in the forms, reports, etc.


For any questions or clarifications, please contact TrakIT Support.

Thursday, 27 January 2022

Finance Documents

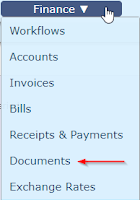
With the latest update of TrakIT, all documents under finance module can be viewed and emailed from Finance > Documents. Accessing this page requires the relevant permission defined in the user's role under Admin > Role Management.


Documents Page

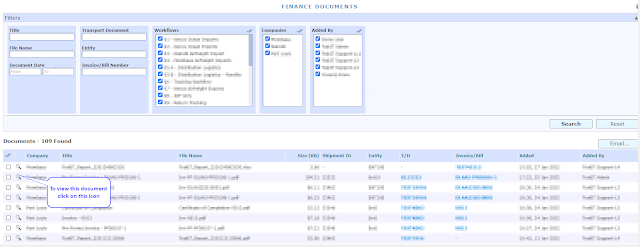
This page gives all the details of the documents added under the finance module. You can view Invoices, Credit Notes, Bills and other documents uploaded by the users. The document's list can also be filtered based on Document's Name, Required Period, Entity, Invoice / Bills number, Workflows and so on.

A specific document can be viewed by clicking the magnifying glass icon.


Emailing the documents

To email specific documents, select the respective checkboxes and then click on the Email button. Any number of documents can be emailed in one go.

On clicking the Email button a pop-up screen will appear as below.


The number of documents selected and the total size will be displayed on top.

Multiple recipients can be added, to email it to yourself, click on the Add Myself link. If the selected documents belong to same entity, then the Add Entity option will be visible. Clicking on it will add the email addresses of that entity to the recipients list.

Customized subject and message can be specified by filling the respective fields.

The documents can be emailed as attachments or as links. For sending as links, select the checkbox Send links instead of attachments. If sending documents as attachments, the total size of the documents cannot exceed 10 MB.


For any questions or clarifications, please contact TrakIT Support.

Friday, 14 January 2022

Hiding Accounts

With the latest update of TrakIT, accounts can now also be hidden or deleted. Select the checkbox(es) of the account(s) and click on the required action from the Task Menu.

Hide Accounts

Select the account(s) and click on Hide Accounts from the Tasks menu. This action will hide the selected account(s) from the screen and also display the number of hidden account(s).

Show Accounts

The hidden accounts can be viewed by selecting the checkbox Show Hidden under the Tasks menu.

The hidden accounts can also be shown again by selecting the account(s) and clicking on the Show Accounts under the Tasks menu.

These options are only visible in case it has any hidden account(s).


When reversing an invoice, the associated accounts as well as the accounts associated with the resulting credit note are automatically hidden.

For any questions or clarifications, please contact TrakIT Support.