With the latest update of TrakIT, a new module for Quotations has been introduced under the Finance menu.
The Quotations module allow you to quickly create a quotation for a customer before even creating the shipment. After approval, the quotation can be generated on a PDF file and sent to the customer at the click of a button. You can finalize the quotation or revise it any number of times.
Viewing Quotations
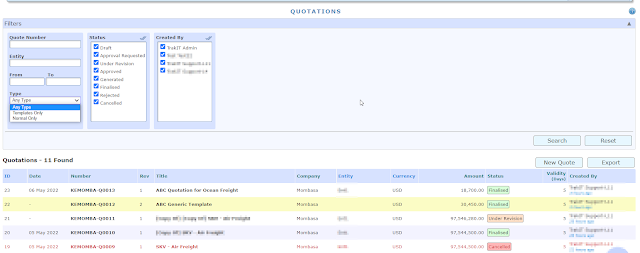
Go to Finance > Quotations to get access to all quotations for your company or companies that you have access to. You can filter quotations using the filters provided or create a new quotation.
Yellow highlighted row indicates that the quotation is a Template. Cancelled quotations are displayed in Red.
The list can be downloaded in the excel format by clicking on Export button.
Creating Quotations
To create a new quotation click on the New Quote button.
Quotation can be of types 'Normal' or 'Template'. The major difference is that if the quotation is of 'Template' type it cannot be generated but can be replicated to create new quotations, thus saving time to create them from scratch.
Note:
- The title of two quotations cannot be same within the same company.
- By default the primary company is selected of the user. In case of multiple company access, select the required company from the dropdown.
- Internal Remarks can be seen on the Quotation details page.
- External Remarks and Terms & Condition can be printed on the quotations.
As shown in the below image, fill in the details as per the requirement and then click on the Create button.

On creation, the quotation is initially in the draft status and the revision is indicated as 1. The Quotation can be replicated, edited or deleted.
To add accounts click on the Add button and fill in the details as indicated. Below image for your reference.
After adding the account click on the Request Approval or Approve button as per user access. On approval, you see as per the below image that the status is updated to approved. On Revision, the Revision count will increase by 1.
Generation of Quotation
1.Pre-requiste: In Form Definitions, under Finance tab, create a form template with sub-type "Quotation".
2. Click on the Generate button as shown in the above pic, and from the drop-down select the form templates available as indicated in above point 1. If the quotations need to be emailed, select the checkboxes as required.
3. Click on the Generate button.
After Generation of Quotation
To view or download the pdf, go to Documents tab and click on the respective icons. The 'R1' in the file name indicates the revision number.
External files can also be added here, by clicking on the
Add Files button.
The work flow of a Quotation is as depicted below.
Notification emails are sent to the users having access or users selected under Notify Users field on each status change.
Quotation Permissions
The relevant permissions for user roles must be allocated for various actions possible with Quotations. This must be granted by System Administrators at Admin > Role Management > Role Customisation.
For any questions or clarifications, please contact TrakIT Support. We welcome feedback and suggestions for this new Quotation module.


