Thursday, 6 September 2018

New User Role Management (for Admins)

This article is a 'must read' for TrakIT Administrators for major upcoming changes in TrakIT.

Over the past many years, we've received many requests for enabling or disabling some features or sections in TrakIT for specific users or groups. Until now, TrakIT had a few fixed operations roles that the users could have - namely: Read-Only, Operations, PowerUser, Admin and SysAdmin. These roles had fixed accessibility and permissions across the application. In addition, we had several finance roles for various actions in the finance module.

As TrakIT keeps evolving, newer requirements and newer modules are added to the system. Maintaining the same amount of flexibility with fixed roles has been increasingly more challenging with clients having very specific requirements about users roles and the actions they are permitted to make.

We have been working very hard over the last few weeks on a completely new User Role Management module that will give you unlimited flexibility over how you can control what users see and can do in TrakIT. Over the next week or two, we will releasing the new Role Management Module.

The previous roles (with the exception of the SysAdmin), will be deprecated from TrakIT. The SysAdmin, as before will have complete and unrestricted access to all sections of TrakIT. Therefore, it is imperative and there are only one or two SysAdmins for TrakIT in your organization.

Roles will not be fixed any more and they can be created and modified by the SysAdmin. Additionally, each action for a role can be defined in a comprehensive list of actions available for the whole application.

User Role Management

The Admin > Role Management page is accessible only by SysAdmins. The page has three sections:
  • User Role Assignment
  • Role Customisation
  • Role Masters

Assigning User Roles

When creating a new user, you can specify an initial Role for the users, subsequently, you may assign more roles. A user can now have multiple roles.


To assign a role to a user, simply select the user on the left table, click the 'Add Role' button, select the role and click 'Add'.

To remove a role, click the remove icon next to the role. The changes are immediately applied to the user's profile even if he is logged on. The user does not need to logout and login again for the role changes to have effect.

Role Customisation

To customise the actions that a role may make, you first need to select the Role you want to customise form the drop-down list.

Every action that can be taken in the TrakIT is listed in various Sections, which are then grouped together. There are currently five major groups, listed alphabetically.
  1. Admin
  2. Finance
  3. Operations
  4. Reports
  5. System
Each Group has multiple sections listed. Clicking on a Group expands the Group and displays all the sections within the Group. Clicking on a Section expands it and displays all the actions within that section.

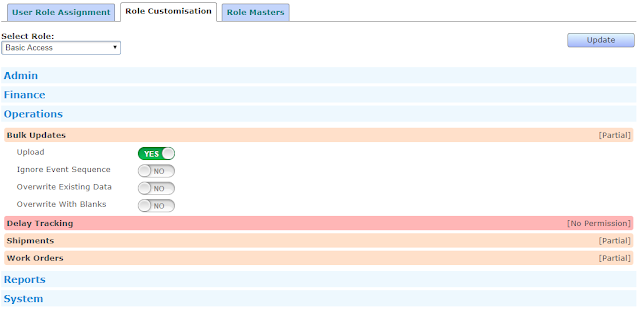
Shown below is an example where the SysAdmin is customising the 'Basic Access' role. The action for uploading a file for bulk update has been granted. The Upload action belongs to the Bulk Updates section that belongs to the Operations Group.


Once you assign/remove actions for the role, you must click on the 'Update' button to save changes.


Role Masters


The Role Masters tab allows SysAdmins to create new roles or remove roles as required. The previous roles in TrakIT will now be visible as "Fixed" roles that cannot be renamed. Eventually, these will be unlocked as well.


Summary


The new User Role Management module will provide unlimited flexibility in how you can control what users do. Every action in TrakIT can now be controlled and can mimic your company policies on what users can or cannot do. This will greatly increase the security of your data as well as prevent un-authorised or accidental updates or changes in TrakIT.

If you face any issues with user permissions or if you have any questions, please contact TrakIT Support.

Wednesday, 29 August 2018

Getting the distance between Depots

TrakIT can use the Google Maps API to calculate the driving distance between two depots. To enable this feature, make sure you have set the locations of the depots in Admin > Geography & Access. Only Administrators have access to do this.

On the Work Order where you need to calculate the distance, make sure the Origin and Destination depots are set in the Header. Then, click 'Depot Distance' from the WO Menu.


This opens a popup displaying the Origin and Destination Depot locations as well as the addresses (if found).


It displays the kilometer distance as well as the driving time between the two locations. The driving time is based on current traffic conditions. Click the Open Routing in Google Maps link below the map to open another window in which you can see the full details of the route and also plan alternate routing.

If any of the depots is missing from the work order or doesn't have its location set, the distance cannot be calculated.

For any questions or information, please contact TrakIT Support.


Saturday, 11 August 2018

Entity Data Fields

With the latest update, we have added Data Fields for Entities. This option has been added for all the entities under Entity management and is to be used for storing any extra data about entities that isn't present in the header fields.

For example: Contract Expiry, Account Manager, Secondary Address, Etc. You  can create any number for data fields for each Entity Type.

To create Entity Data Fields, go to Admin > Master Tables and select "Data Field Definitions". Select "Entity Fields" and then the Entity type from the drop downs. Click the create button to add new Fields each with a unique name and code. 


All these data fields will be shown under Entity Data tab on the Entity Detail page for specific entities.


For any questions or concerns, please contact TrakIT Support.

Sunday, 15 July 2018

Search a Number Range in Data

With the latest update, you can now search for a number range in  the Data fields of work orders. This option has been added to the Ops page Data filter that can be added using the customize filter option.


Select the Data Field you want to search for and select the 'Search Mode' as  Number Range.

The following options will be available:

  • Equal To - The data value should be exactly equal to the specified value [ = ]
  • Not Equal To - The data value can be any value except the specified value [ <> ]
  • More Than - The data value should be more than the value specified  [ > ]
  • Not Less Than - The data value should not be less than the value specified [ >= ]
  • Less Than - The data value should be less than the value specified [ < ]
  • Not More Than - The data value should not be more than the value specified [ <= ]
  • In Range - The data value should be in between Min and Max values (inclusive)
  • Outside Range - The data value should not be between Min and Max (inclusive)

Enter the number in the box provided and click Search. In the case of "In Range" and "Outside Range", enter the Min and Max values. Only work orders that have the relevant search conditions met will be displayed. Please note that this search criteria will only work for numeric fields and computed fields that have numbers in them.

For any questions or concerns, please contact TrakIT Support.

Wednesday, 13 June 2018

Know Whats Happening When

With the latest update of TrakIT, we've added a new page to help view events on a Calendar. What you see is a simple calendar (starting with the current month) with each date showing the number of events happening on that date.

A sample calendar displaying the number of "Container Cleared" on each date is show below.


Clicking the date displays the complete list of events for that day, including the links to the work order and the workflow it belongs to.

The calendar also includes "Info Only" events and Data fields that store dates. You can filter the figures by the Workflow or the Master Event.

As this is a new feature, please do let us know your suggestions or feedback for improvement. If you are facing any issues, please contact TrakIT Support.