Saturday 7 August 2021

Requesting Documents from Customers/Others

With the latest update of TrakIT, you can now send a document request email directly to concerned parties and also allow them to upload the documents into TrakIT without having to log in.

Requesting a Document

If the Document Checklist is defined in the Workflow, you will be able to select one or more checklist items and request the document for the selected items to be uploaded or emailed to you.

Select one or more checklist items and then click 'Request Documents'


In the pop-up, you can specify your own Subject and Message if you like. Select the recipient to whom the email should go.


Based on the option selected by the user an email will be sent with the link to upload the document or with the user's email address requesting the document(s). The email will look similar to the below example:


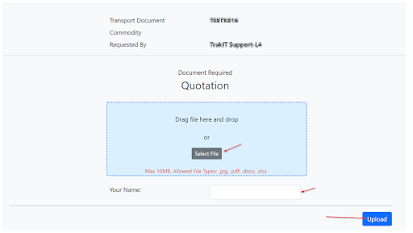
When the recipient clicks on the 'Upload Link', they will be redirected to a Document Upload page where they will be able to select and upload a file. The document upload link is only valid for 8 hours.


The document uploaded through the document link will be linked with the requested shipment as well as the checklist item and will be displayed in the “Documents Uploaded” tab.

The status of the checklist item is set to “Requires Validation” and an email is sent to the requestor.


For any questions, clarifications, or feedback, please contact TrakIT Support.

Monday 2 August 2021

Link Documents to Document Checklist

With the latest update of TrakIT, you can now link and update the document checklist while uploading or updating documents. 


Uploading Documents

If a Document Checklist is defined in the Workflow, you will be able to select a checklist item and also set the status of the item when you are uploading a document. If you select a checklist item, then only one document can be uploaded at a time.


Linking a Document to the Checklist

If a document has already been uploaded, it can be linked to a checklist by selecting the modify option on the document.


Upon selecting the checklist item and status, the previous status will be over-written.

The checklist item linked with the document is displayed with the document.


For any questions or clarifications, please contact TrakIT Support.


Thursday 29 July 2021

Update On Event Calendar

With the latest update of TrakIT, the calendar popup for populating events has been changed to allow faster one-click entries of the event with a 'Quick Select' section.


It is very important that events in TrakIT are updated as soon as possible after the real event happening. This will reduce the event update delay and also trigger corresponding actions in a timely manner.


The correct way to use this calendar is as follows:


Immediate Event Update

If you are updating an event immediately after it happens (which is the preferred way), you can simply click "Current Date/Time" to populate the current time into the event box. In almost all cases, this is the default selection that should be used.


Delayed Event Update

If the event is being updated after a significant delay (for example, the event happened yesterday), then you must first set the time of the event on the right side and then click the date on which it happened. If the time is not set, the default time of 12:00 will be used.


Future Time/Date

For Info-Only events like ETA, ETD, etc., simply click the future date on the calendar. It will be entered with the default time of 12:00. If a different time is required, it can be set prior to the selection of the date. Future dates are enabled only for Info-Only events.


Not Applicable / To Be Advised

If an event is not applicable for the work order, simply select "Not Applicable". If the event time is not yet known, simply select "To Be Advised".


Clearing the field

Use the 'Clear' link to clear any existing data in the text box.


For any questions or clarifications, please contact TrakIT Support.

Tuesday 13 July 2021

Separation of Accounts by Company

With the latest update of TrakIT, all workflows now have multi-company finance capability - without having the set the 'Multi-Company' option in the workflow definition.

However, this also means that users can now access accounts only of their own assigned companies. The selected company is displayed at the top left of the finance page. If the users has access to only one company, the drop-down will be disabled for the user.


If you are unable to see or access accounts on the finance page, please check the company you are assigned to and correct the selection.

Users can also be assigned to multiple companies via the User Management page > Access Roles tab.


Please contact TrakIT Support for any assistance.


Thursday 1 July 2021

Menu Redesign

The main menu is the portal through which you can quickly access different modules and area of TrakIT.

In the latest update of TrakIT, the main menu has been redesigned to support dynamic menus which will be introduced soon.

Old Menu


New Menu


The new menu is lighter and faster to respond. A few items on the Admin menu have been re-organized. 

We have been working on re-designing the main menu to make it dynamically controlled. This means that, in the future, we will be able to control visibility of the menu items based on the user's role, company or location.

If you notice any issues with the new menu, please let us know immediately.