Sunday 4 September 2016

Have Customers upload their documents directly

In the latest release of TrakIT, your customers can now upload documents for their shipments directly into TrakIT via the customer's login.

Once the customer has opened a work order after logging in, they can click the 'Documents' tab to view all documents for that shipment or work order. On the top right, there is an 'Upload' link that allows them to set the document title and upload a file to TrakIT.


Documents uploaded by customers are always uploaded for the shipment as a whole (i.e. they will appear in all work orders in the shipment).

After the document is uploaded, a notification email is sent to the person responsible for the work order, providing the document details as well as the shipment details.

For any questions or concerns, please contact TrakIT Support.

Tuesday 9 August 2016

QR Codes - Tag your Shipments

Identification of parcels, packages and shipments can be tedious when done manually. TrakIT can now generate QR codes to identify shipments, packages and parcels quickly. QR codes are basically extended versions of bar-codes that can hold a lot more data.

QR codes can now be included in any form that is generated by TrakIT. The QR code can be scanned by any QR Code Scanner application either on your computer or on your mobile. Scanning the code and clicking the link will directly take you to the work order.

QR codes also ensure authenticity of documents as QR codes can contain encrypted data as well. We will be expanding new features in TrakIT using QR codes in a variety of ways.

A sample QR code in a form is shown below. Scanning the code will take you straight to the work order. In this example below, scanning the code will take you to the TrakIT Home page.


We will be adding the QR Code scanning capability soon in our Android application. For any questions, feedback or guidance, or to add a QR code on any of your forms in TrakIT, please contact TrakIT Support.

Monday 25 July 2016

Restricted Reports - Hiding sensitive and/or financial reports

With the introduction of the newfinance module, TrakIT contains a lot more sensitive data than it used to. Although, finance information is tightly controlled by finance roles, finance related data fields added to custom or advanced reports are not restricted from curious users.

In the latest update of TrakIT, you can create "Restricted" custom or advanced reports. Restricted reports are those reports to which only the creator of the report has access to (and System Administrators as well).

An existing report cannot be converted to a restricted report and vice-versa. To create a new restricted report, simply select the checkbox when creating a new report.


Once a restricted report has been created, it will have a icon next to the report name. The report will be visible only to you and to System Administrators. Hence, other users will not be able to see fields or subscriptions being used in the reports.

When creating a restricted report, please be careful of who you add as a recipient for the report as TrakIT cannot control who you send the report to.

For any questions or concerns, please contact TrakIT Support.

Friday 1 July 2016

TrakIT Customers and Finance Job Changes

TrakIT Customers


Over the next few updates of TrakIT, we will be making some significant changes to the way TrakIT handles customers of shipments. The scope of the changes can be summarized as follows:
  1. Make Contractual Customer as the main customer and make it mandatory
  2. Disallow Contractual Customer and Shipper/Receiver to be work order specific
  3. Status Update Notifications to be sent to Contractual Customer instead of Shipper/Receiver
  4. Split Shipper/Receive field into Shipper and Receiver
While it sounds simple enough, there are many other related changes with respect to reports and status updates that will need to be changed.

In this update of TrakIT, we've implemented point 1 and 2:

Contractual Customer is now Mandatory - The Contractual Customer field has switched places with Shipper/Receiver is now the first field to be filled when creating a new work order.


Change of Contractual Customer and Shipper/Receiver always apply to T/D - When modifying a work order header, changing the contractual customer or shipper/receive will always apply to the whole shipment and cannot be changed on individual work orders.


The check-boxes for "Apply to T/D" will always be disabled for Contractual Customer and Shipper/Receiver.

For any questions or concerns regarding the current and upcoming changes, please contact TrakIT Support.


Finance Job

With the latest update, we've added the Contractual Customer's credit status to display on the Finance Job page. Additionally, a "Details" link has been added next to the Weight/Volume field to display details for individual work order.


The Income, Expense and Margin columns are now displayed on the Finance Summary page as well.


For any questions or concerns, please contact TrakIT Support.

Friday 10 June 2016

Direct Chat with Support

At Bitmetric, we're always looking for faster ways to support our customers and resolve their issues. With a growing number of customers, email support can sometimes get painfully slow and frustrating.

To enable quicker support, faster resolution of your questions and issues, we've implemented direct chat with TrakIT Support with the latest update of TrakIT.

At the bottom right of the screen, a chat window is now available. Click on the chat window, enter your name and you can chat with TrakIT support and ask any question directly!


If necessary, TrakIT Support can raise a ticket directly from within the chat system. 

Please note that currently direct chat support will only be available during business hours in India and not available on weekends and public holidays.

For any questions of concerns, please contact TrakIT Support.

Disclaimer: Direct chat is powered by the Tawk To platform. Bitmetric is not responsible for continuous availability or disruptions to the direct chat system. 

Saturday 14 May 2016

New Finance Module Kicks Off!

As some of you may have been aware, we had been working on a re-designed finance module for TrakIT. We have just released the first phase of the new finance module - to allow you to estimate and record actual transactions on your shipments and calculate your Gross Margin on each shipment.

The next phases of the Finance module will include reporting, invoicing and other features.

Let's take a look at how the Finance module works...


First Things First - Finance Roles

We understand that access to Financial figures in your business needs to be very tightly controlled with respect to who can see, modify, approve costs, etc. With respect to this, we have added completely separate and independent Finance Roles for TrakIT users. These are independent of the Operational Roles of users. The "Finance" role under the ops role list is now redundant and will be removed from the operations role list in the next update of TrakIT.


Unlike operational roles, a TrakIT user can have multiple finance roles. On the user management page, on the row menu of a user, a new "Finance" option is available to SysAdmins as well as Finance Admins.


As you can see, multiple finance roles can be selected for a user (with certain exceptions). Lets take a look at each role:

Review (Read Only) - This role provides a user with 'Read Only' access to finance information for shipments in the user's corridors. This role cannot be combined with other roles.

Estimates - This role provides a user to initialize and update estimate accounts only.

Actuals - This role provides a user to update actual accounts and transactions (including payment modes, transaction details, etc.)

Job Approval - This role allows a user to approve the estimates for a job before commencing on the job. When a job is approved, the estimate account are copied to the Actuals.

Job Close - This role allows a user to close a job, cancel a job or re-open a job. A job can be closed only when payment mode has been specified for all actual accounts.

Invoice Creator - This role allows a user to create invoices (This is currently under development)

Invoice Approves - This role allows a user to approve and send invoices (This is currently under development)

Finance Admin - This role allows users to grant/revoke finance roles (except finance admin) for other users and also set up the default accounts for corridor shipment financials.

In addition to the above roles, users can see Income related accounts only if the option Access Income Accounts has been selected. Without this option, a user will never be able to see Income accounts or even Gross Margin.


What's an Account?

Before we proceed further, let us understand what an "Account" in TrakIT means. An account can be defined as a single transaction that takes place during the course of a shipment.

There are 4 types of accounts: Income Accounts, Expense Account, Pass-Thru Account and Info Account. Each account belongs to Master Account Type that is defined in System > Master Tables > Finance Masters. Accounts can belong to the same Master type, yet be of different transaction types. For example: you may have two accounts called "Transport" - but one as an Income and another as an Expense.

An account is also applied in a specific way: per Shipment, per Work Order, per Kg, per m3, per TEU, or manual. TrakIT automatically calculates the total amount based on the quantity selected for the shipment.


Corridor Shipment Financials


While it is possible to add finance accounts for each shipment individually, it would become very tedious to do this for each shipment. For this purpose, the Finance Admin can define a number of accounts for the corridor that are added to each shipment when the accounts are initialized. The below screenshot displays an example set of accounts for shipments in a corridor.


When adding a new default account on the corridor, the following fields are available:

Account - The account must be selected from the list of master accounts. The master accounts are defined in Admin > Master Tables > Financial Masters

Account Detail - If the account name is not sufficient to convey the account meaning, a detail can be added that will be appended to the account name. For example, can add "Agency Charges" as an account twice and then specify in the Detail field as to which is which.

Account Code - The account code is a unique code that refers to the account. Ideally, this should be left to the default that is selected when the Account is selected. This needs to be changed only when the same account is to be used twice.

Transaction Type - The account transaction type denotes the type of account: whether it is an Income, an Expense, Pass-Thru or Info Only.

Applies To - This defines how the amount specified for the account is applied. By default, it is applied to the whole shipment. But you can also specify the amount to apply per work order, per Kilogram, per cubic meter, per TEU or even manually. TrakIT multiplies the amount when the relevant factor when calculating the total amount.

Alternate Currency - Some accounts are transacted in a currency other than the default corridor currency. In such a case, you can specify the default currency so that it does not need to be specified each time.

VAT - This indicates if a Value Added Tax is to be applied on a specific account. The percentage figure of the VAT can be specified here.

Active - Indicates if the account is active. This means the account will be used when accounts for a shipment are initialized.


Shipment Finance Jobs


Once the default accounts are completed, shipment can now be initialized with the default accounts. On the main menu, click "Finance" to open the main finance page for shipments. (If Finance is not available from the main menu, please contact TrakIT support to have the Finance module enabled).

The Finance page is similar to the operations page, whereby you can customize filters and search for various shipments. The main difference is that there is no "Work Order" view. You can see all shipments listed individually along with the work order count and the status of the finance job.

By default, the Status for all shipments will be "Draft". This means the shipment estimates have not been approved or the accounts have not been initialized.


Clicking on any shipment will open the Finance Job page. The finance job page displays the complete finance information for a single shipment.


The accounts can be initialized from the Corridor default accounts by clicking on the Initialize Accounts button. This copies all active accounts from the Corridor Shipment Financials to this particular shipment.

Once accounts are initialized, you can click on each account name to open a popup where you can specify the amount for the account as estimated.


The VAT, Amount and Alternate Amount/Currency as well as the Remarks can be specified for the estimates.

The Quantity box changes depending on the selection in the 'Applies' field. In case of Manual selection, the Quantity box can be updated directly.

As estimates are entered, TrakIT calculates the Gross Margin by subtracting the total expense from the total income. Pass-Thru accounts are not included in the calculation.

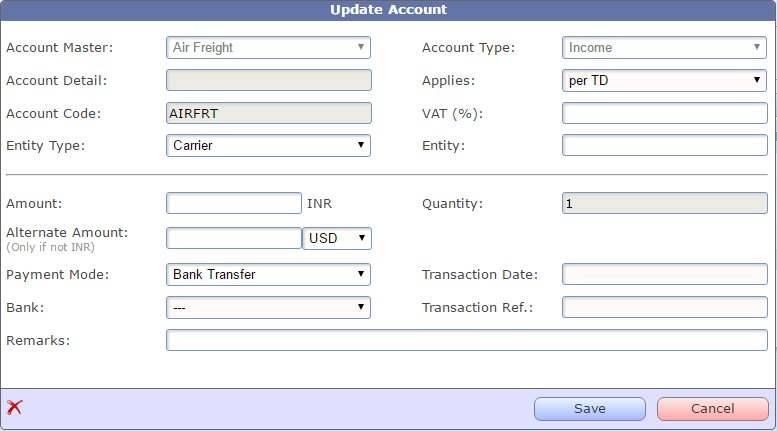
After all estimates accounts have been entered, a user who has the role to approve estimates can click the Approve button to lock the estimates and copy all accounts to the 'Actuals' section. At this stage, the Estimate Accounts are locked and the Actuals are available for updating. Clicking the account opens the same popup with a few more fields:


In addition to the fields present in estimates, you can specify the Entity relevant to the account as well as the payment mode. If the payment mode is selected, then the fields relevant to the payment are mandatory. Banks can be added via the Entity Management page where a new category of entities called Banks is now available.

Updating the actual accounts results in the summary and Gross Margin being updated. Once the payment modes for all accounts has been specified, the finance job for the shipment can be closed by the person with the relevant access. A job can also be cancelled at any stage.

In addition to the defaults, accounts can be added and removed as per requirements - both at the Estimates and Actuals stage.


What's Next?

The above is just the beginning of the Finance module.

In the next update of TrakIT, we will make all financial figures available in the reports as well as forms. Dedicated finance reports will be available similar to Advanced reports. A new Finance Dashboard is under design and Invoicing module will be made available.

For any feedback and suggestion on the development so far, please let us know so we can improve and optimize the Finance module to suit your requirements even better.

Monday 25 April 2016

Native Android App Released

We've just upgraded our TrakIT mobile app to a native Android app from the previous hybrid app. The native app provides a very smooth and slick user interface using Google's latest Material Design.

The app is available at the Google Play Store.

Here are some screenshots:


At present, the app is read-only. In the next update, we will be bringing the capability to update events and data fields. The app can be used by your customers to track their shipments as well. (You will first need to create external users and link them to entities.)

Suggestions and feedback on the app are most welcome. Help us improve the app.

For any questions or concerns, please contact TrakIT Support.

Thursday 24 March 2016

Document Checklists

With the latest update of TrakIT, we've introduced a new way for you to maintain Document Checklists for shipments. Very often, some documents or requirements are forgotten during the course of a shipment. The Document Checklist feature sits within the Documents tab within a work orders and provides an overview of all documents for the shipment.

Before this feature can be used, the Corridor Administrator must set up the specific documents required for the corridor. Go to Admin > Corridor Definitions > Select a Corridor. In the corridor definition page, select the "Document Checklist" section and click 'Create' to add new documents. In addition to the document name and description, you can specify whether the original document or a copy is required.


Documents added here are automatically displayed on all work orders (there is no need to add them to past or existing work orders). They can be re-ordered as required.

In a work order, the document checklist is displayed within the Documents tab. The Upload Documents table has been re-sized to be smaller.


Clicking on the status of a document allows you to change the status of a document. The name of the user changing the status is logged. An entry is made into the Work Order Audit log as well.


For any feedback, suggestions, questions or concerns, please contact TrakIT Support.


Saturday 27 February 2016

Work Order Volume and Entity Credit Status

With the latest update of TrakIT, two new features (among other changes) have been added:

Work Order Volume

A volume field has been added to the work order header. This is to facilitate LCL shipments and Air Freight as well. The volume is always measures in cubic meters (m³) and must always be less than 1,000 m³. Accuracy is maintained to three decimal places.

The field is not mandatory by default, but it can be made mandatory for specific corridors by selecting the field in the Corridor Definition > Mandatory Header Fields section.

You can specify the volume for each work order at the time of creating the work order, or when modifying the header of a work order.


The Volume is available for export in Custom and Advanced reports as well, under the "Header" source.


Entity Credit Status

It is now easy to maintain a record of an Entity's credit status. This will largely apply to repeat customers and even transporters.

In then Entity Management section, click on an Entity to open the details of the entity. Select the "Credit Status" tab. You can add a new status entry with information like Credit Type, Credit Days, Credit Limit, Credit History and remarks.

Once an entry has been added, it cannot be deleted, only cancelled. Please note that Credit Status entries can only be made by users with Finance Admin role or SysAdmin role. All other users, are able to see the information only.


The Credit Status section is the first of several upcoming changes including a new Finance Module in TrakIT.

For any questions or concerns, please contact TrakIT Support.

Saturday 30 January 2016

Work Order Count and Fill Rate for Event/Data in Corridor Defintion

With the latest update of TrakIT, we've made a slight addition to the event and data view in the corridor definition.

The tables now include the number of work orders where the event / data field is used as well as the fill rate in percentage.


The Fill Rate is defined as the percentage of events/data that are not empty and not "TBA". This gives the administrator a very good overview of fields that are rarely being used and these can either be deactivated or removed entirely.

For any questions or clarifications, please contact TrakIT Support.

Sunday 13 December 2015

Improve your Data Quality

It is quite common for users to miss updating some fields in TrakIT. These could be header fields, events or data fields. This leads to incomplete shipment data, resulting in inaccurate or incomplete reporting to customers and others.

With the latest update of TrakIT, we've implemented a new feature to help improve data quality. Events in a corridor can now require other data fields to be populated before TrakIT will allow the event to be populated. This can be set for each event independently via the Corridor Definition page.


For example, you can specify that the event "ETA Vessel" can only be populated once the name of the vessel has been entered in the data field. Or, you can specify that the event "Loaded on Truck" requires that the Transporter has been specified in the header.

Once a requirement is set, TrakIT will not allow an event to be populated with a date or "NA" until the requirement is met. It is, however, still possible to populate the event with "TBA".

Other Changes

These are some of the other changes in this update:


  1. The size of Item List field for Data fields has been increased to 500 characters to allow for longer lists.
  2. When performing a bulk update via email, you can now specify and additional keyword "IgnoreSequence" (without space) in the subject line to disable sequence checking when updating events. This will work only for users with "PowerUser" role or above.


For any questions or concerns, please contact TrakIT Support.

Wednesday 18 November 2015

Zipped Reports and Mandatory Header Fields

This new update of TrakIT bring the following features among others:

1) Zipped Reports

In the last update of TrakIT, we updated the main Excel component that generates Excel reports. Unfortunately, this has caused some false positives on some email filters for a few customers that caused the Excel reports to be removed from the email. Oddly enough, the emails were let through if the Excel files were zipped and attached.

For such instances, we have implemented a zip feature on Custom, Advanced and SQL reports. When creating the subscriptions for these reports, a "Zip Report" option is now available. When selected, the attachment file is zipped into the standard .zip file format.


Please note that the report will be zipped only when sent via email. Previewing the report within TrakIT will not generate a zip file.

2) Mandatory Header Fields

In many instances, users forget to populate important header fields such as Carrier, Origin Depot,  etc. when creating work orders. To prevent this, we've added new functionality within the corridor definition whereby Admins can select which fields from the work order header should be mandatory when creating work orders.


Go to Admin > Corridor Definitions, select a corridor and then select the "Mandatory Header Fields" section. A list of header fields is displayed (not all) where you can select the ones you want to be mandatory when creating work orders. Remember to click 'Save' once done. The "Shipper/Receiver" field is always mandatory.

3) Create Work Order Page Redesign

The page for creating new shipments has undergone a slight re-design. It now uses tabs to prevent users from having to scroll down too much. The corridor selection has been moved to the top and the user must select the corridor before anything else is shown.


For any questions or concerns, please contact TrakIT Support.


Friday 23 October 2015

"New and Improved" Delay Tracking

With the latest update of TrakIT, The 'Container Tracking' module has changed to Delay Tracking with the addition of one major feature.

Previously, when a user populated an event in a work order that was designated as a ‘Container Tracking Entry Event’, the container was added to the list of the active containers (if not already there). Thereafter, TrakIT calculated the allowed and actual days as well as the total cost until the time the container "exited" the tracking. The issue with this was that TrakIT could track only one kind of a charge with one container. It was not possible to track the same container for multiple types of charges.

A new field called Tracking Type has been introduced. This field can take one of several types that are defined by System Administrators in Master Tables > Delay Tracking Type. Any number of Tracking Types can be added here. By default, the following are present:


All events that were previously set to trigger entry or exit from the 'Container Tracking' section will now trigger entry or exit for the 'Carrier' tracking type in the Delay Tracking page.

Administrators can now specify the trigger actions for any event based on the Tracking Type. A single event can trigger multiple entries for the same container into the Delay Tracking module.

As an example below, the 'Discharged' event will trigger Delay Tracking of both 'Carrier' and 'Port Storage'.


When the Discharged event is populated with a date in a work order, two entries of the container will be added to the Delay Tracking module - one for Carrier and one for Port Storage.

The delay slab rates and free days can be specified as usual via the Delay Tracking Costs section in the Corridor Definition.

The Delay Tracking page now has a new filter - Tracking Type


And the Tracking Type column is displayed as the first column.


It is possible to have multiple designated entry event and exit events in a corridor. You can have same containers multiple times for different ‘Tracking Types’.

As before, the rates, free days and exit work order number and date for a particular container entry can be modified by clicking on the 'Modify' action in the row menu.

Containers that are active in the Delay tracking module will also show up on a new tab in the corresponding work order for that container.

For any questions or concerns, please contact TrakIT Support.

Friday 25 September 2015

More about Functions

Although users in TrakIT have different roles and responsibilities, they can make updates on all events or data fields in a work order if their role and location assigned allows them to.

However, in many circumstances, not all events should be update-able by a user who has access to a work order. For example, you might not want a user in sales updating events that are supposed to be updated by Operations.

With the help of ‘Functions’, Administrators can assign specific rights to events so that only the events or data which match a user's functions can allow the user to update them.

When an event or data field is assigned to one or more functions, only those users who are assigned to one or more matching functions can update that event or data field.

Functions are defined by System Administrators in Master Tables > Function Definitions.


Assigning functions happens in two steps:

1) First the event should have one or more functions assigned to it. As an example below, the 'Shipping Order Received' event can have as many functions as you want to assign. Select ‘Functions’ from the row menu in Corridor Definitions and then you will get complete list of functions.


2) We can assign functions to users via User Management. Assigning functions to a user can be done while creating user profile or by editing user profile. Users who are not assigned to functions, will not be able to edit event or data fields that are assigned to functions. They will, however, be able to view them. 


For any questions or concerns, please contact TrakIT Support.

Wednesday 26 August 2015

A Fresh New Website

We've update the TrakIT web site. Our new site is fully responsive (adapts to mobile devices) and has a fresh site design with minimal clutter and an easy layout.


We hope you like it! Suggestions are welcome :)

http://trakit.in 

Thursday 20 August 2015

Custom Reports Improved

Among other changes in the latest update of TrakIT, the Custom Reports page has been re-designed and improved.

'Corridor Selection' has been removed and reports from all corridors display together. A new filter section has been added to enable users to find specific reports based on various fields.


As usual, when the a report is selected, the report details (Fields, Customer & User Subscriptions) display below the report.

For any questions or clarifications, please contact TrakIT Support.

Monday 20 July 2015

Get Events Relevant to Customers Only

Until now, there was no dedicated way to have only the events relevant to the customer set as the status of the events. Reports that had the "Last Event" field that were going out to customers, would include internal workflow events that were not relevant to the customer.

With the latest update of TrakIT, two new header fields have been introduced for Custom & Advanced Reports: Customer Status and Customer Status Date. These fields work just like the Last Event and Last Event Date fields, except that only those events that are relevant to the customer will appear here.

The work order header now displays the event information as shown below:


You can now add these fields in Custom and Advanced Reports:


Defining Customer Relevant Events

How does TrakIT know which events are relevant to the customer? This can be set in the event definitions in the corridors.


When creating a new event or modifying it, set the field "Customer Access" as required. The field has three options:


NoAccess - The event is not relevant to customers
Visible - The event is relevant to customers and the event can be set as the status of the work order.
Updatable - The event is visible and also updatable by the customer.


Customers who are registered for Status update emails will only get emails when the Customer Status event changes, and not when other events are updated.


For any questions or concerns, please contact TrakIT Support.

Wednesday 1 July 2015

Recipient of Which Reports?

With the latest TrakIT release, users can see what reports have them listed as a recipient.

Go to Report > My Reports. Your favorite reports are now displayed under the relevant tab and the list of reports in which you are a recipient is displayed under the 'Report Recipient' tab.


Please note that this list shows only those reports where you have been added as a recipient using your TrakIT profile. If your email was added directly as a report recipient, it won't display here.

To remove yourself as a report recipient, just click the red cross icon. To add your self back, you will need to go to the report subscription and add yourself as a recipient.

For any questions, concerns or suggestions, please contact TrakIT Support.